DingTalk Administrator Guide: Creating Organizations & Managing Your Enterprise Contacts
Welcome to the DingTalk Administrator Guide by Appnicorn, a DingTalk Malaysia partner: Creating Organizations & Managing Your Enterprise Contacts!
In today’s fast-paced digital world, managing your organization efficiently is crucial for smooth team collaboration. This guide is here to take you through the important steps for setting up your DingTalk organization and effectively managing your enterprise contacts, ensuring that your workspace is well-structured and connected.
You will discover how to create an organization, organize enterprise contacts, and fine-tune workplace settings to boost team coordination. These key steps will empower administrators to establish clear communication channels, enhance accessibility, and ensure secure data management. Whether you are starting fresh with a new organization or looking to improve an existing one, DingTalk offers powerful tools to streamline enterprise contact management, increase productivity, and revolutionize the way your team works.
Table of Contents
A. Create an Organization on DingTalk
Desktop
Setting up your organization is the first step to managing your team on DingTalk. Here’s how to get started:
1. Click “Create an Enterprise/Team” – If you're new to DingTalk, this option lets you establish your organization from scratch. If you already have an organization and want to create an additional one, simply click your current organization name (below your profile picture) and select “New” to set up another team or enterprise.
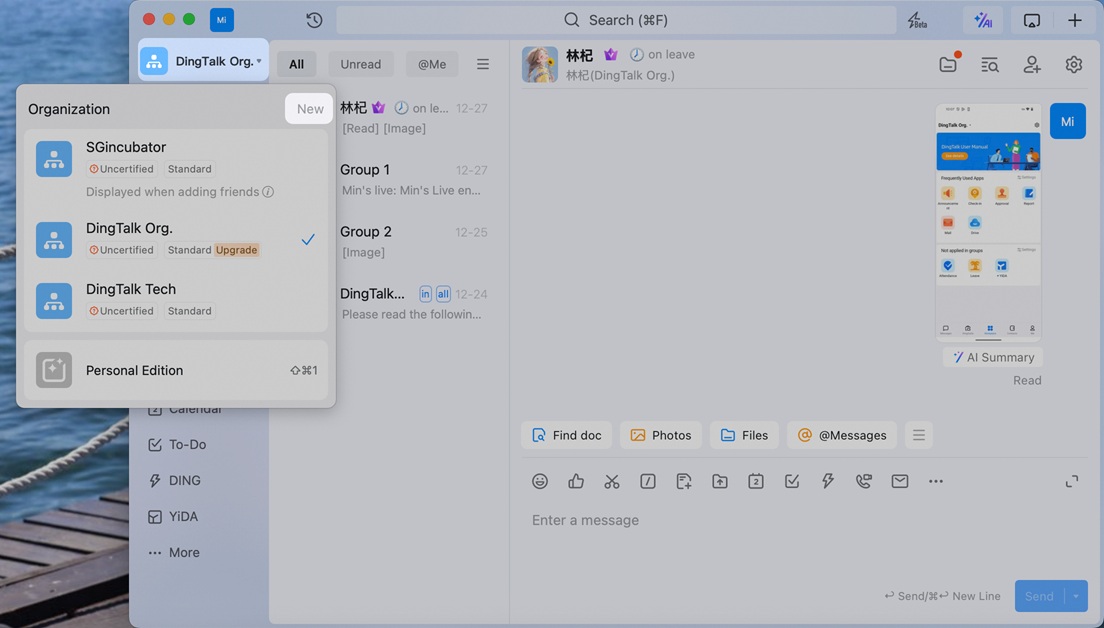
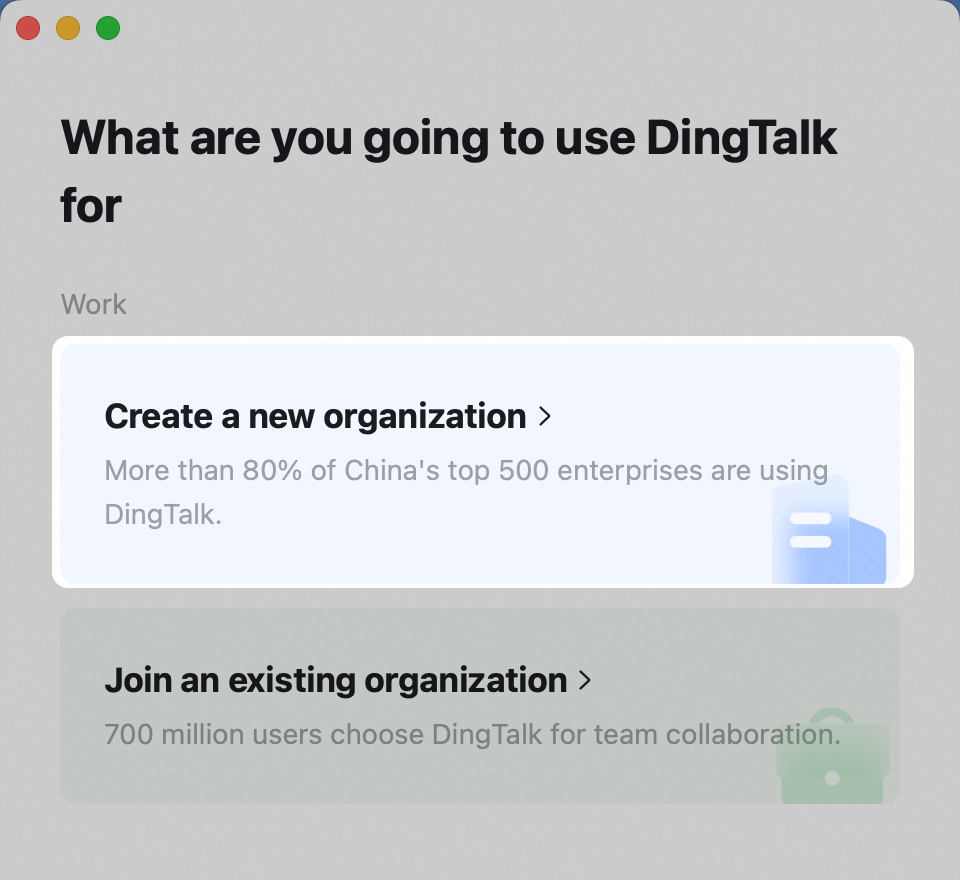
2. Click “Create a new organization”.
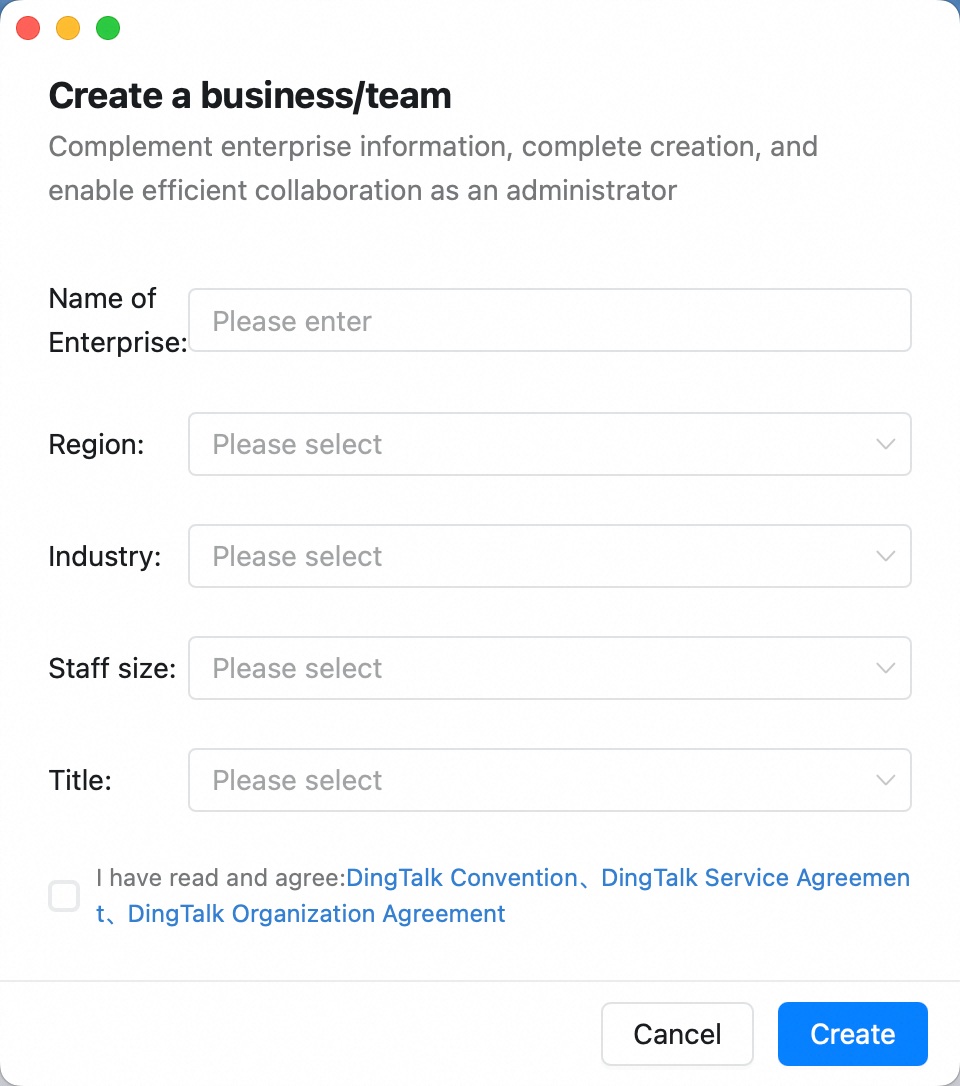
3. Enter all the required information and click “Create”.
Mobile
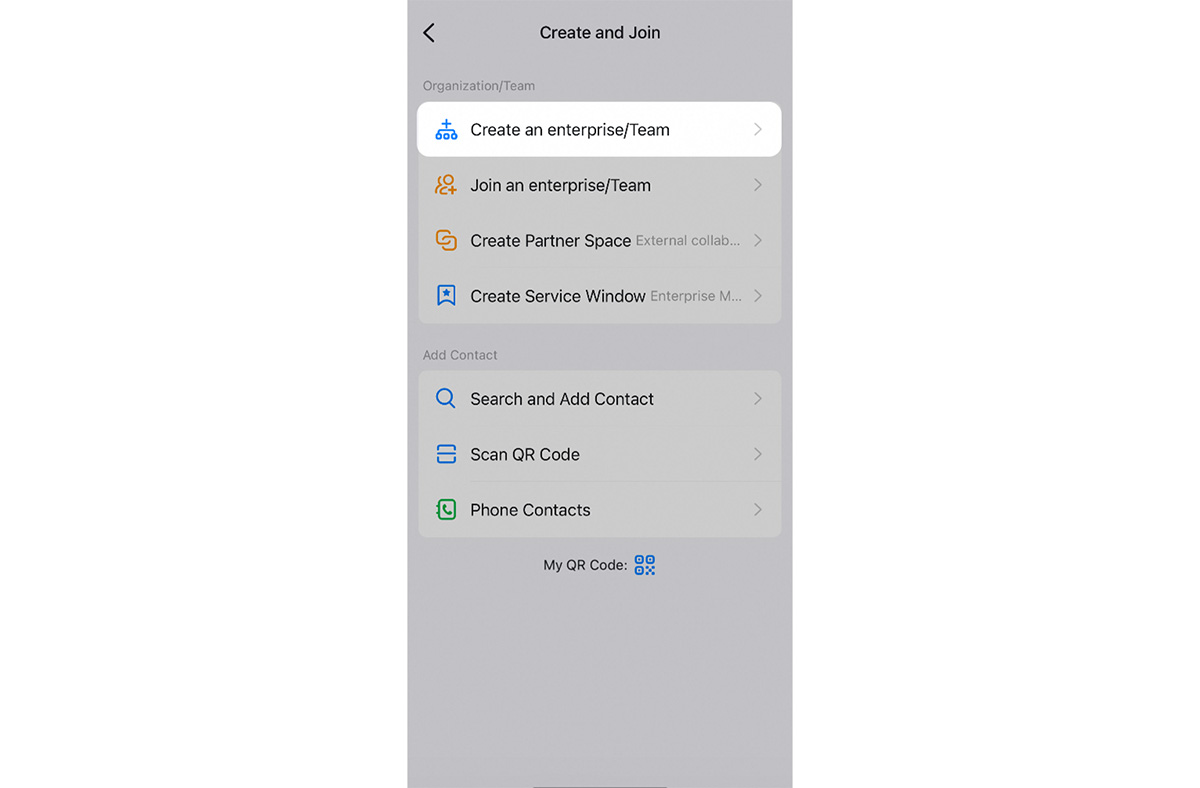
1. Tap “Contacts” and click the “Add User” icon.
2. Tap “Create an enterprise / Team”.
3. Enter your organization's name, choose the industry, and select the region.
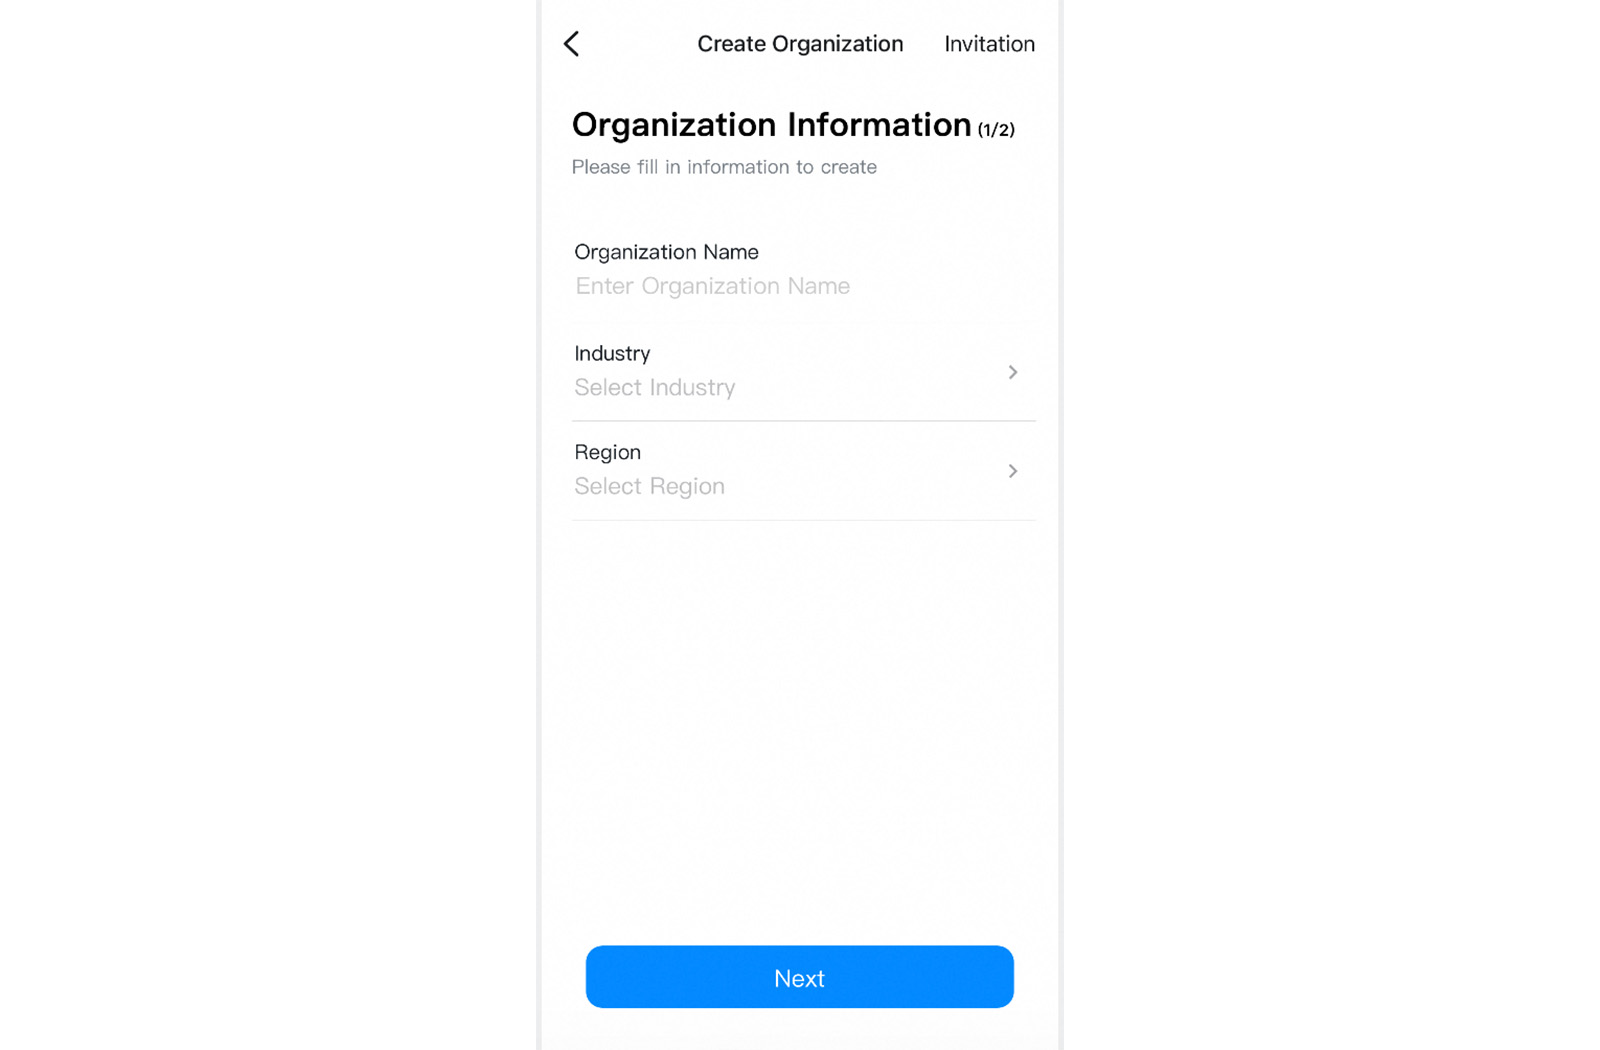
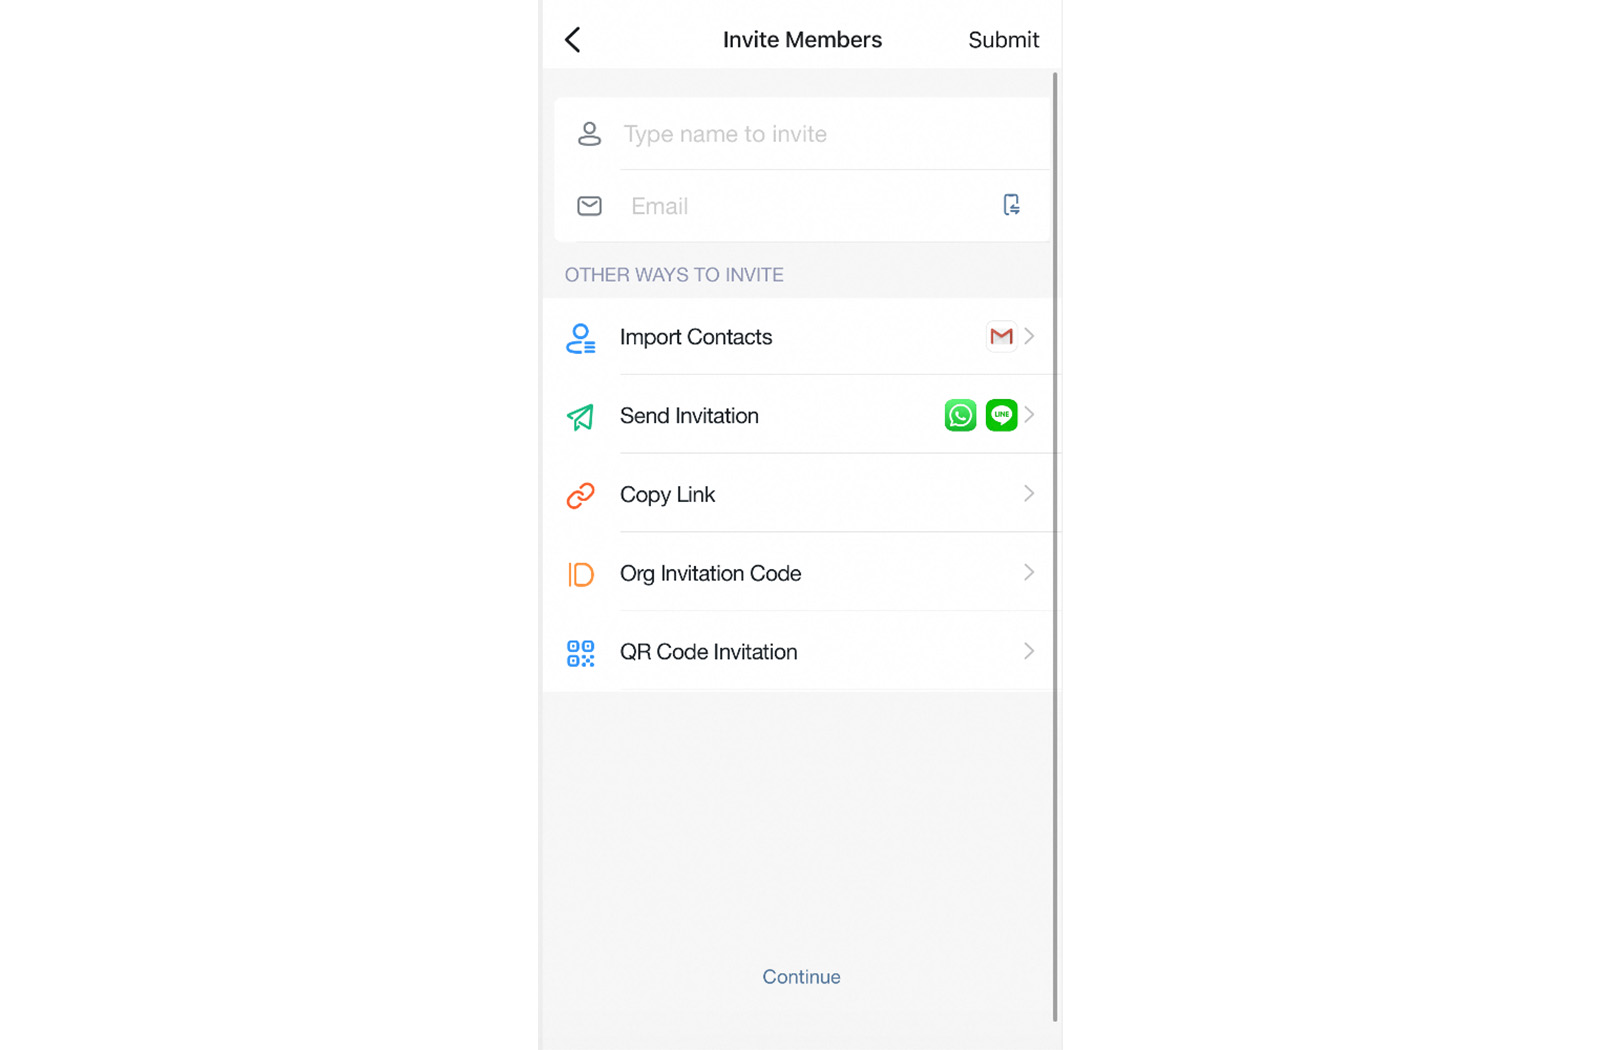
4. Tap “Next” to complete the organization creation. You will then reach the invitation page, where multiple options are available to invite members.
B. Basic Organization Info
Desktop
You can set the name, logo, language and regions for your organization.
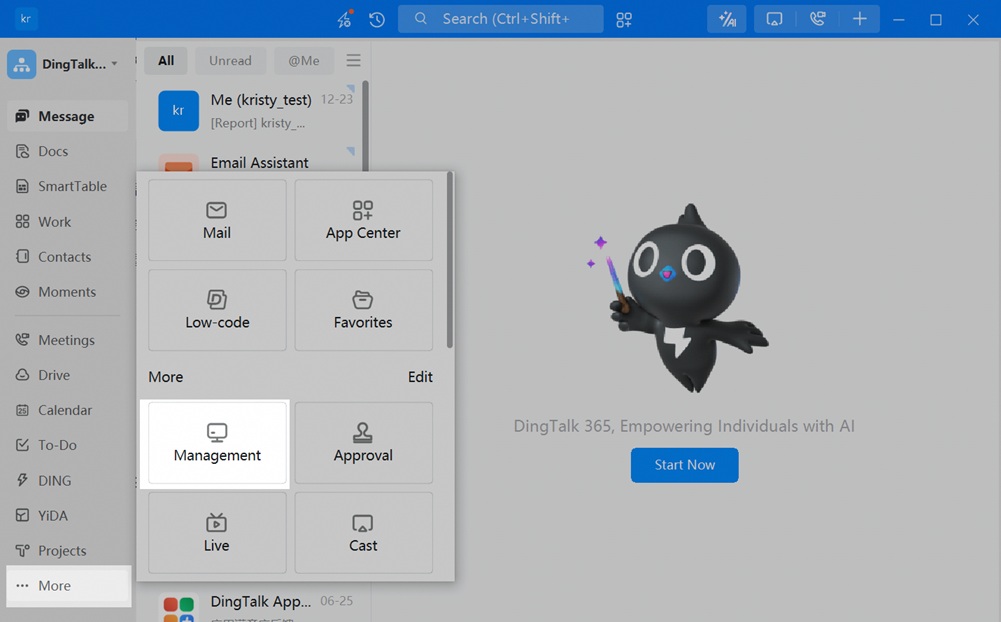
1. Click “More” and choose “Management”, or visit the website at oa.dingtalk.com. Choose your organization and log in to the admin console.
2. Go to Organization Settings > Organization Info in the left navigation bar, then select Organization to set the name and logo.
C. Managing Admins of the Organization
Desktop
The Primary Administrator oversees all organizational management. By default, the group owner holds this role but can transfer ownership or add primary managers.
1. Click More > Management in DingTalk to access the webpage, or visit oa.dingtalk.com. Select your organization and log in to the admin console.
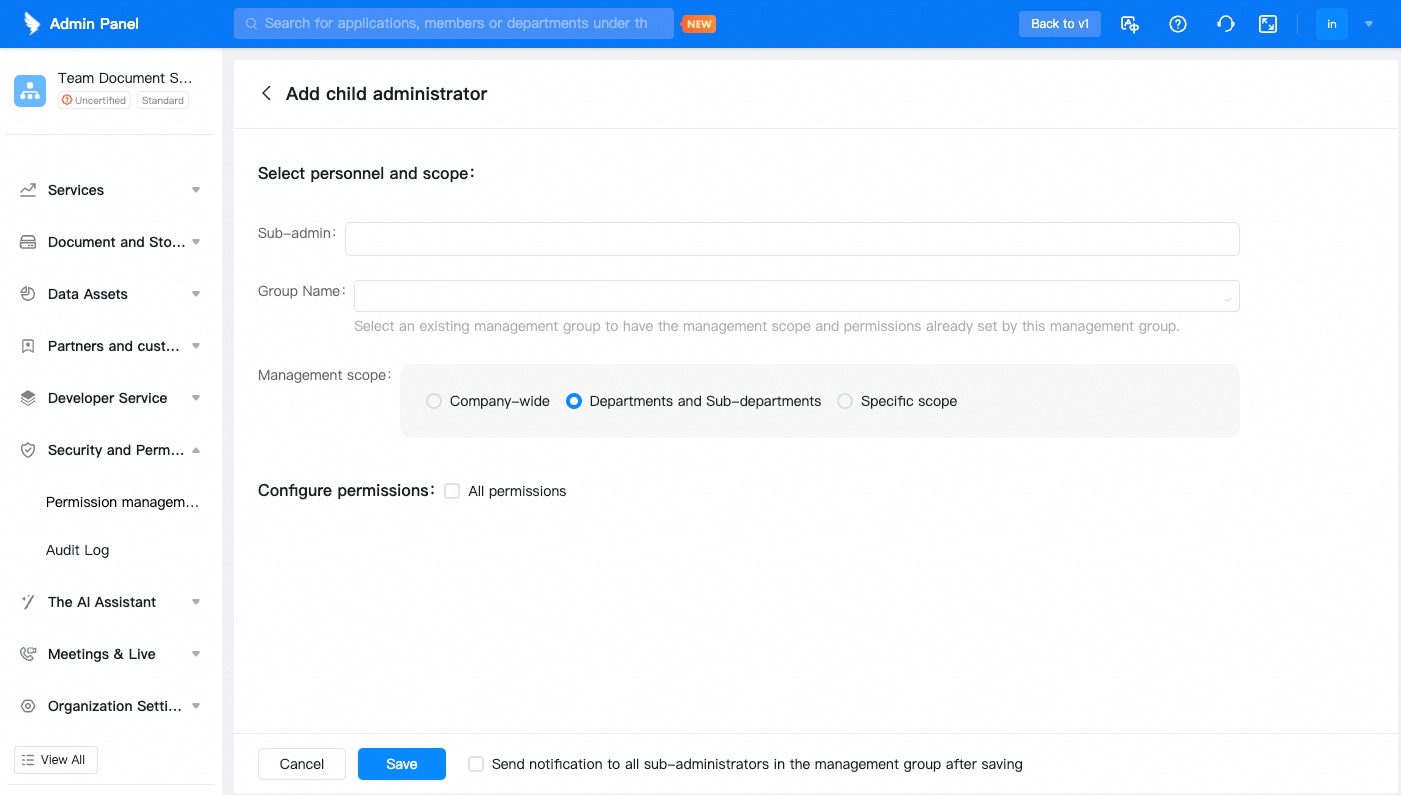
2. Assign Primary Admin or Sub-Admin. Go to Security and Permissions > Permission Settings to assign primary administrators.
For sub-admins, navigate to Security and Permissions > Permission Settings > Sub-Admin, where you can define their permissions.


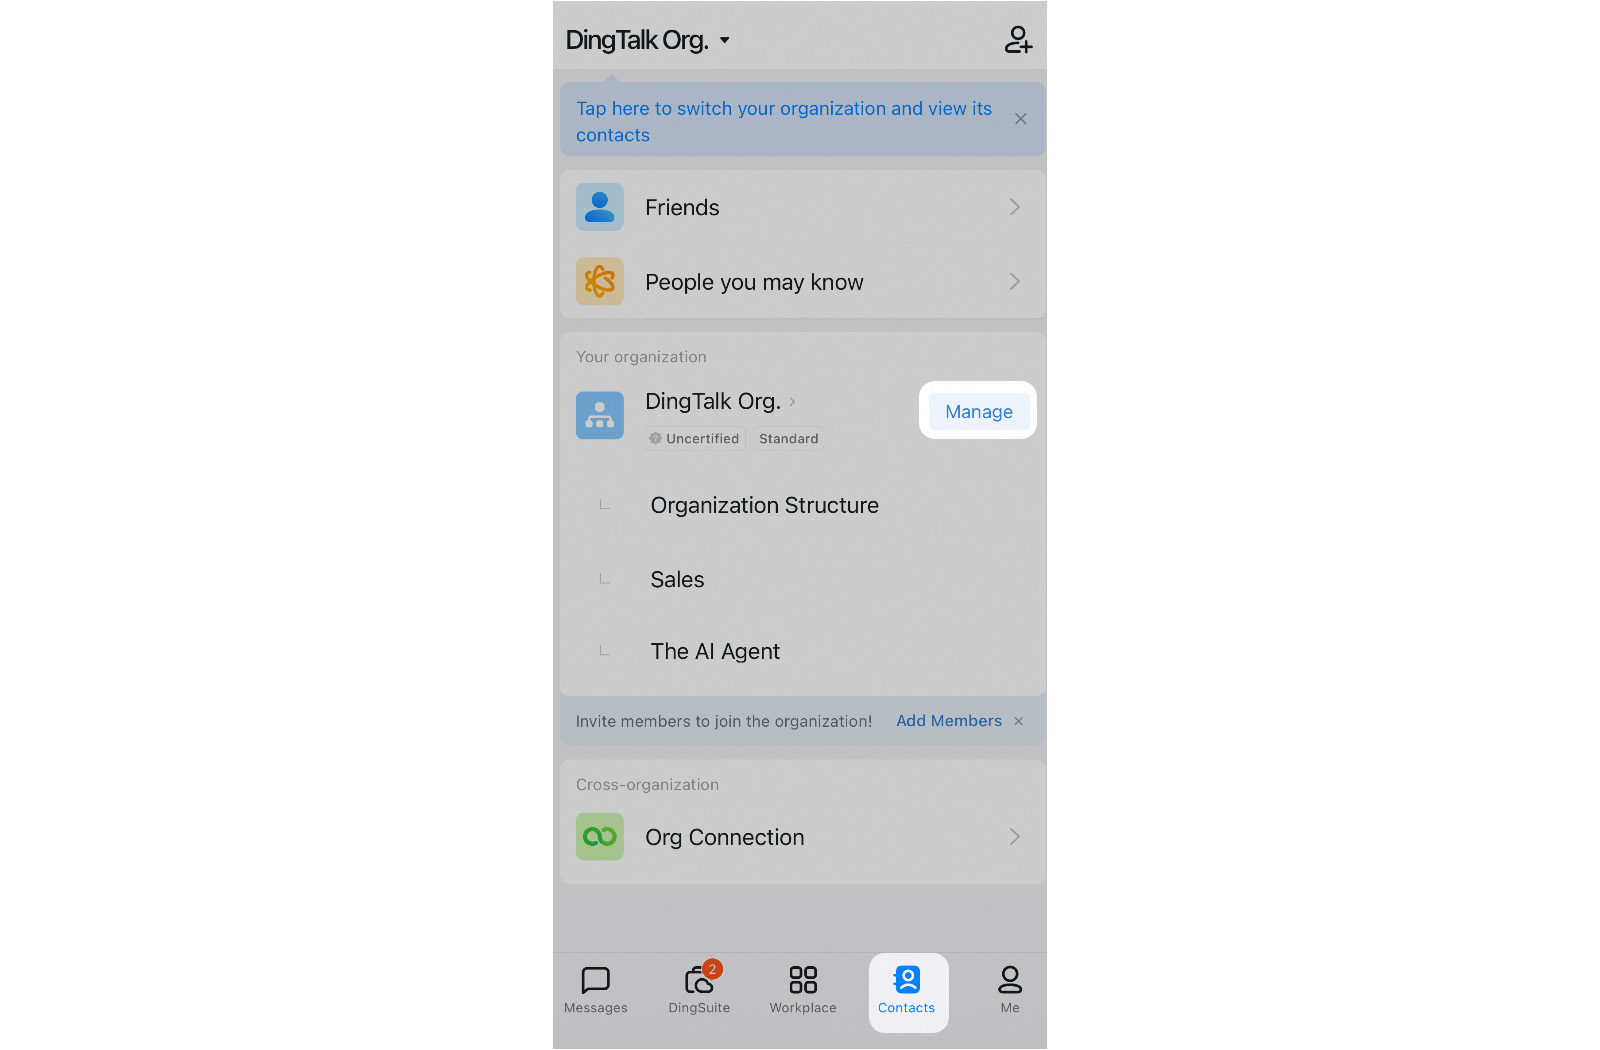
D. Delete An Organization
Desktop
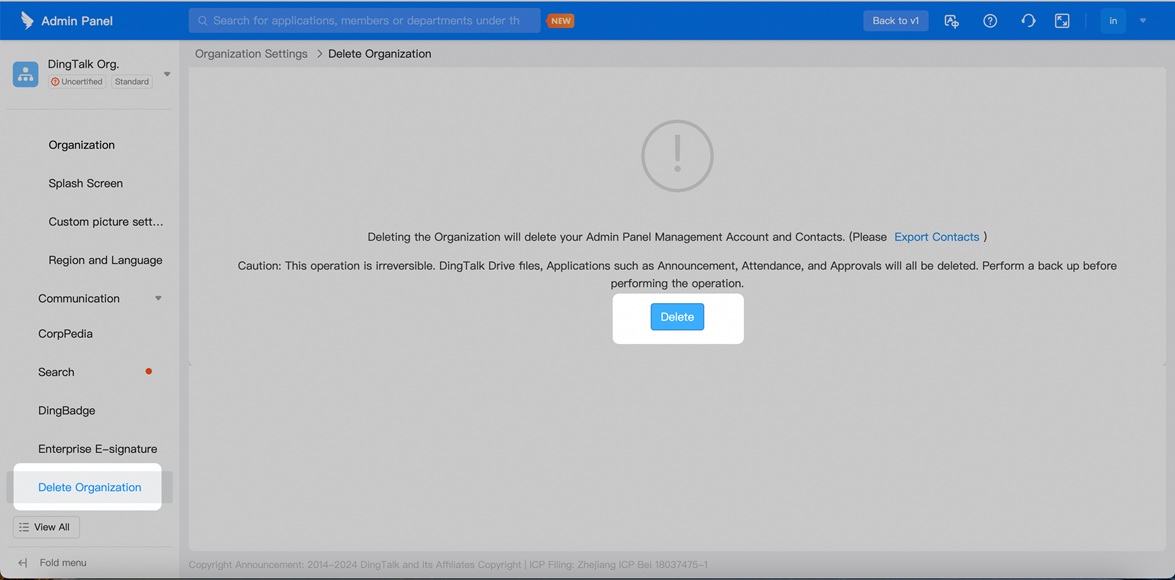
If an administrator or employee accidentally creates an organization, it can be deleted. Admins can manage or remove organizations as needed.
1. Click More > Management in DingTalk to open the webpage, or visit oa.dingtalk.com. Select your organization and log in to the admin console.
2. Go to Organization Settings > Delete Organization > Delete. Note that once deleted, the organization cannot be restored.
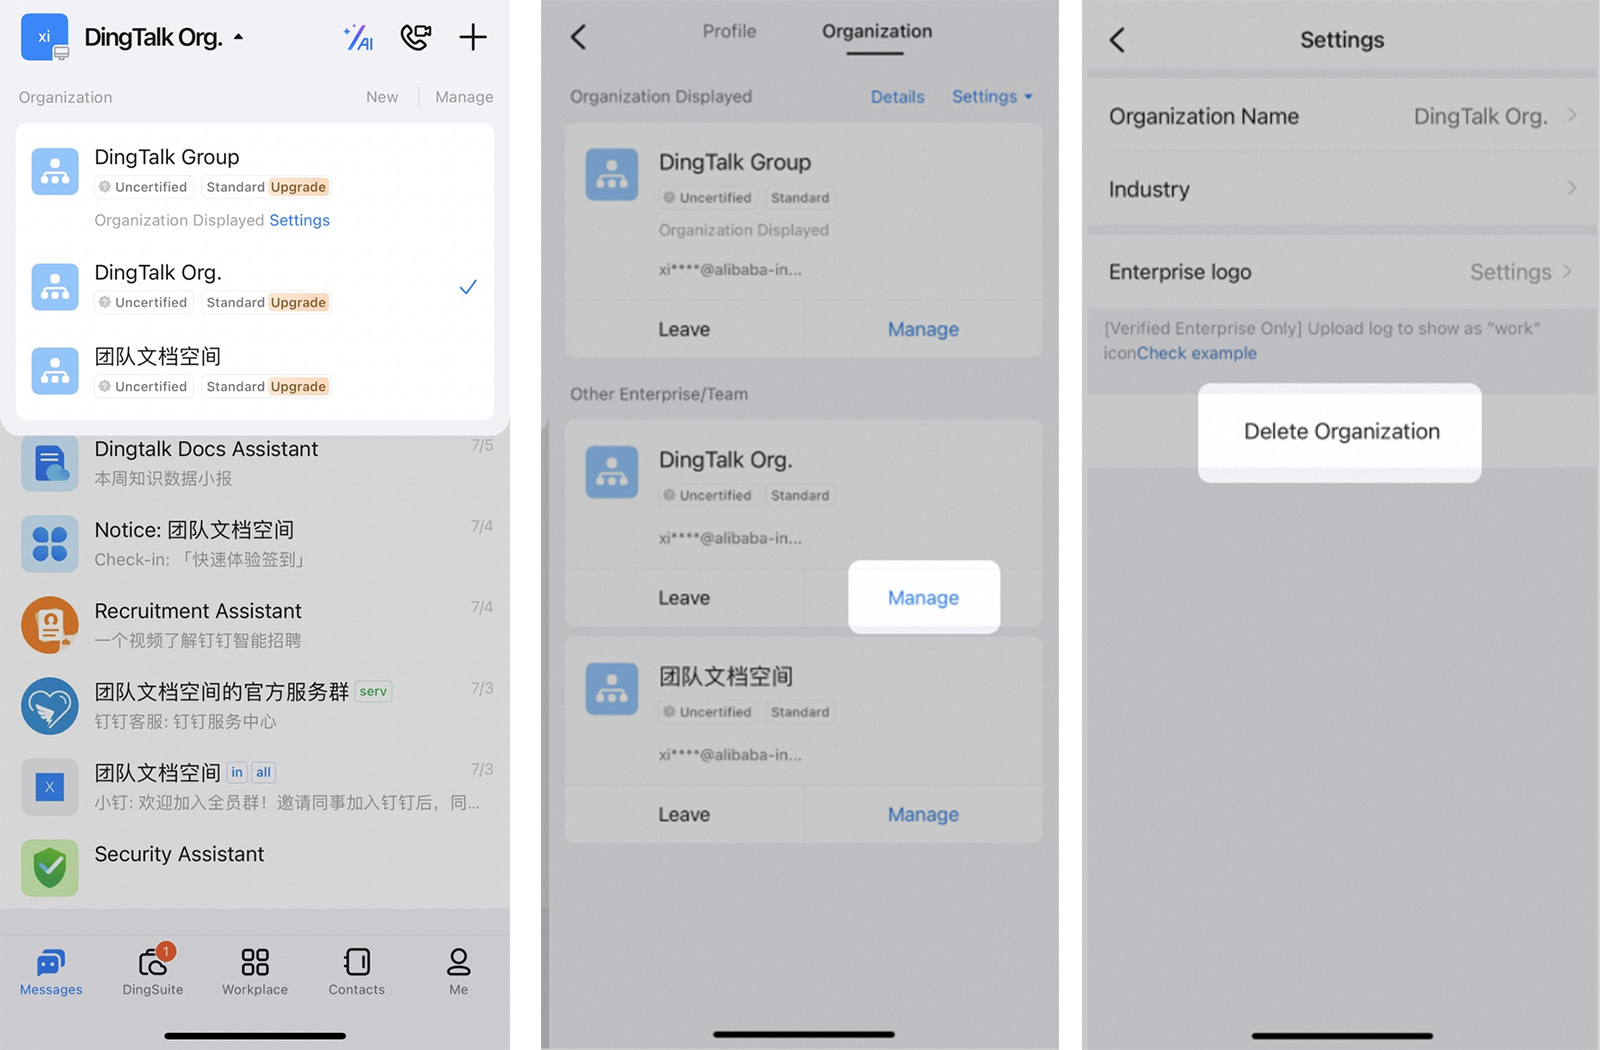
Mobile
1. Go to Contacts, then select Manage. From there, choose Delete Organization to proceed with the deletion.
Introduction to DingTalk’s Enterprise Contact Management
Managing enterprise contacts effectively is key to ensuring smooth communication and collaboration within any organization. DingTalk offers a comprehensive contact management system that streamlines internal coordination, clarifies the organizational structure, and boosts data security. Thanks to its user-friendly design, administrators can easily import employee information in bulk, assign roles, and organize departments, making team management more organized and efficient.
DingTalk also improves connectivity by enabling employees to quickly locate colleagues, share organization-wide contacts, and maintain seamless communication. The platform’s security features protect sensitive data—executives' phone numbers can be kept private, and employees' contact details can be restricted, ensuring corporate information stays safe. Plus, its external contact management allows businesses to keep tabs on customers, suppliers, and vendors in one central location, making business relationships more organized and accessible.
By combining structured contacts, easy access, and strong security, DingTalk empowers enterprises to enhance their communication networks and foster a professional, secure work environment.
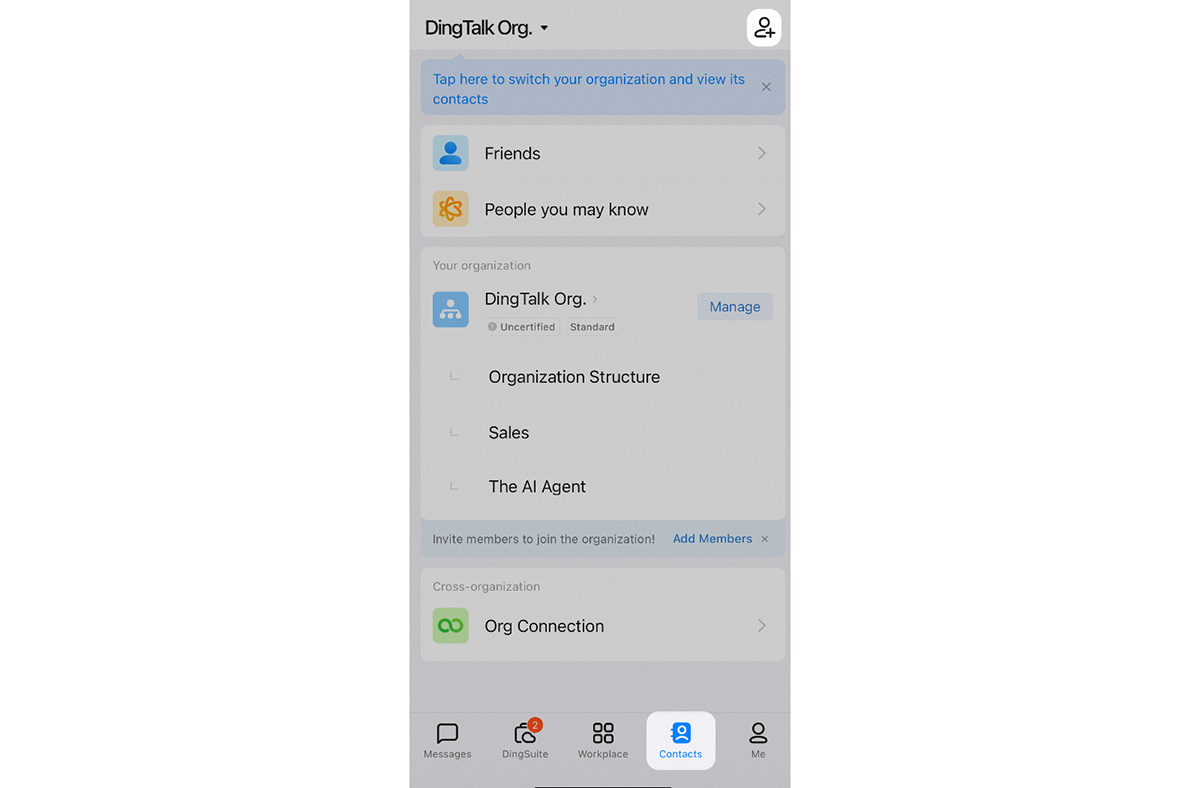
E. Add Organization Members and Departments
Desktop
Administrators have the ability to invite employees to join the organization using various methods, such as manual entry and QR code invitations, while also assigning them to specific departments. The DingTalk Admin Console makes it easy to add multiple members and departments at once, simplifying personnel management and boosting overall efficiency.
1. Click More > Management in DingTalk to open the webpage, or visit oa.dingtalk.com directly. Select your organization and log in to the admin console.
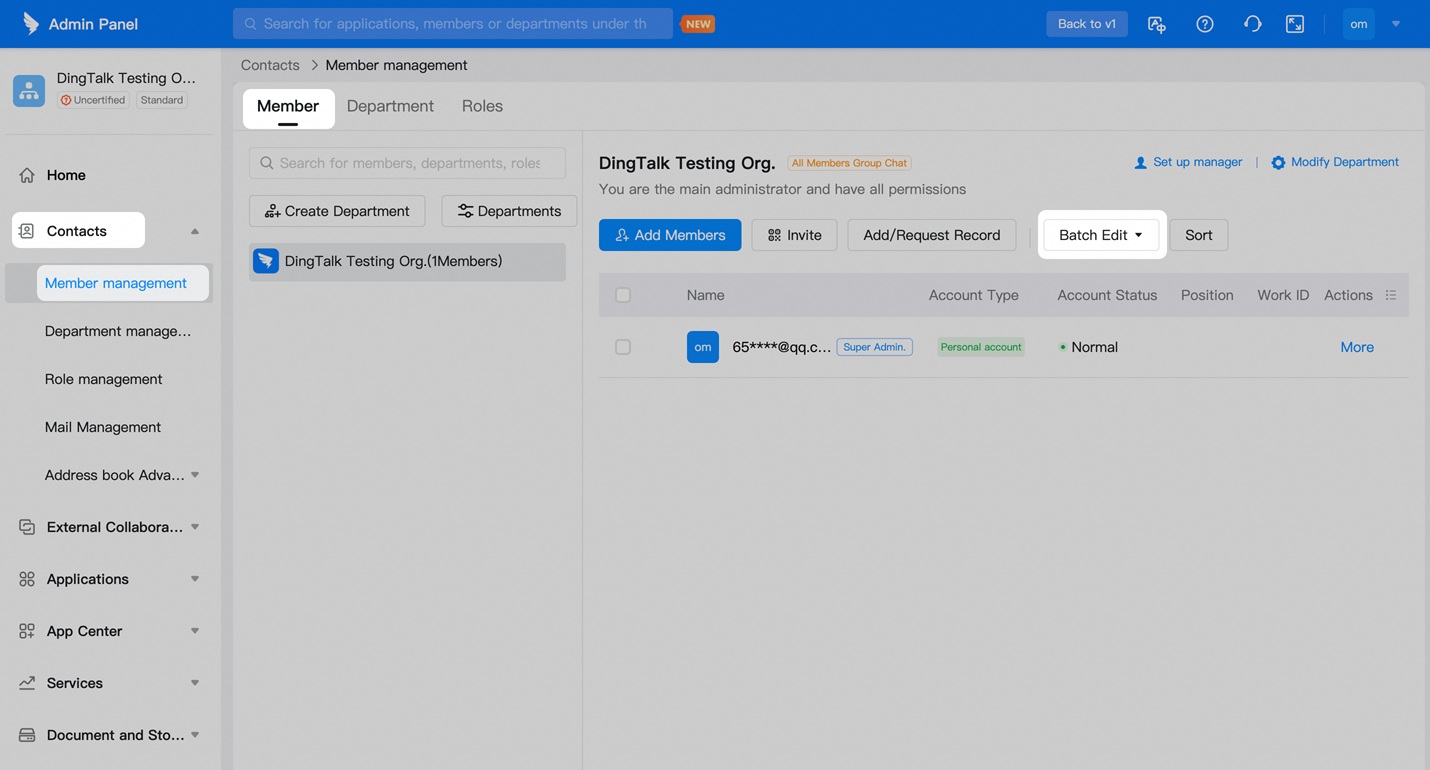
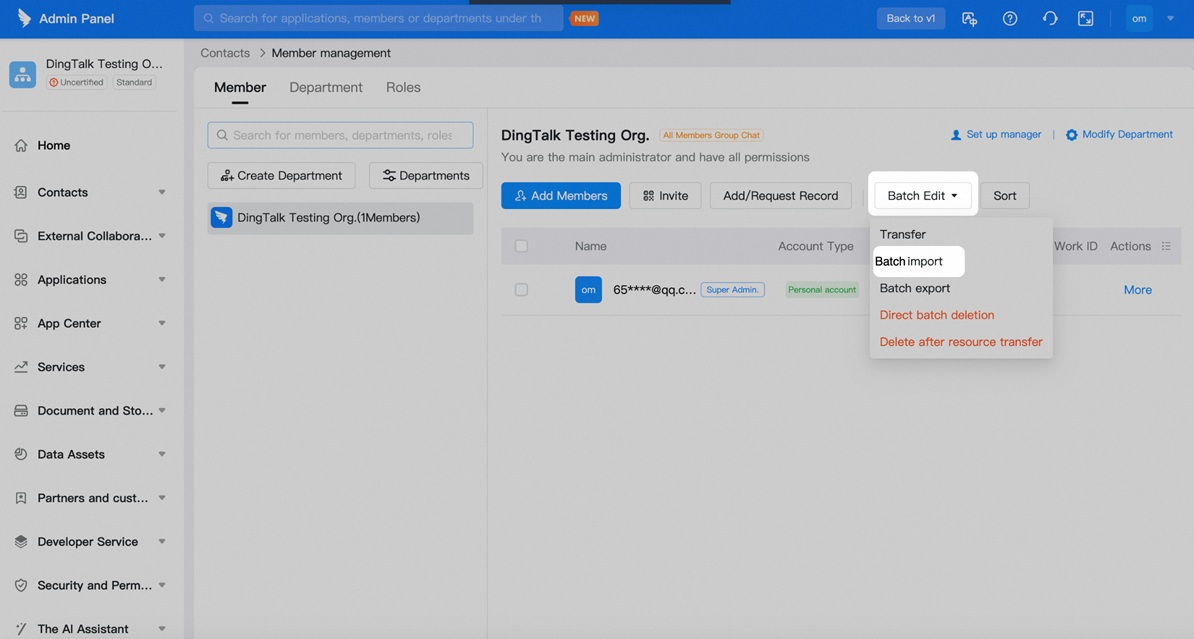
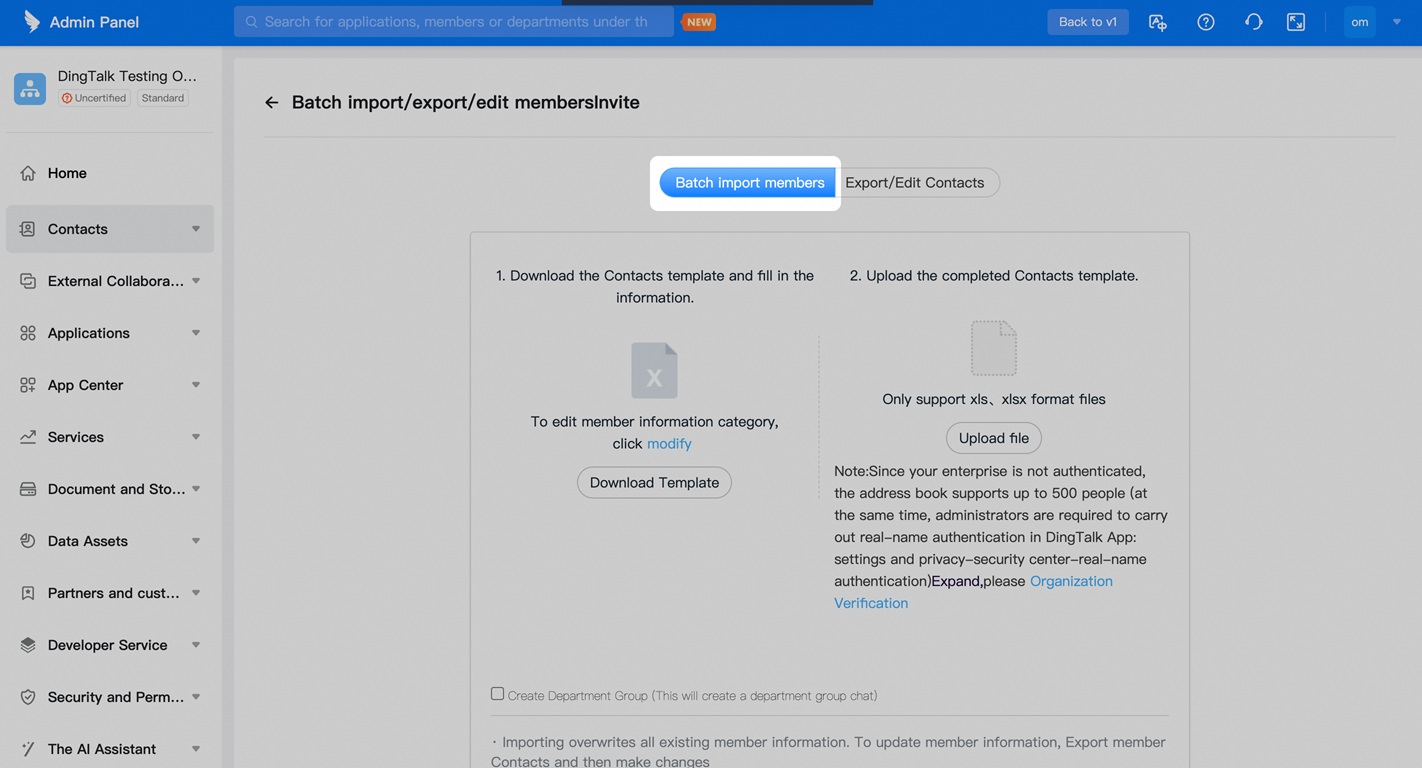
2. Go to Contacts > Member Management. Click Add Members to add them individually or share an invitation code for them to scan with DingTalk and join your organization. Alternatively, select Batch Edit > Batch Import, download the template file, fill it out, and upload the completed file.
3. To add a department, click More > Management in DingTalk to access the webpage, or visit oa.dingtalk.com directly. Select your organization and log in to the admin console.
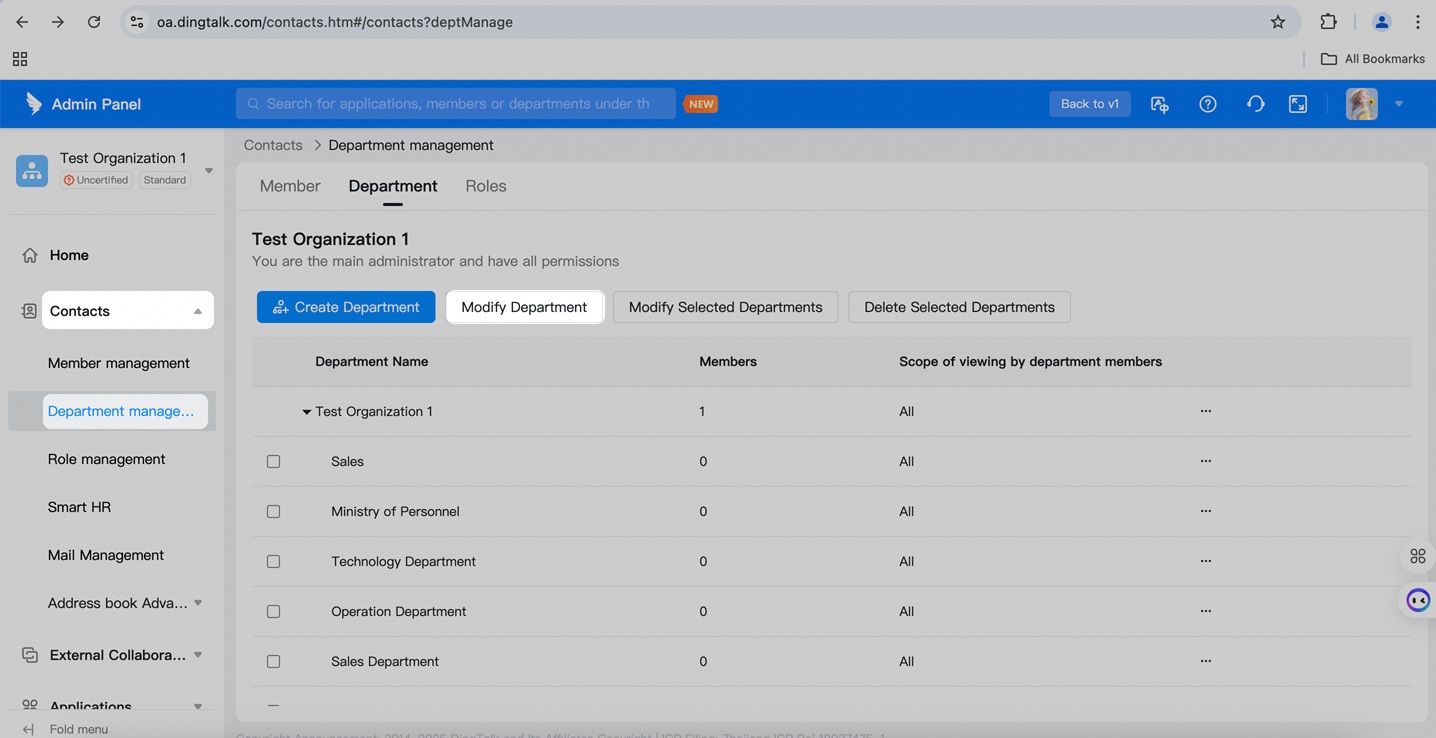
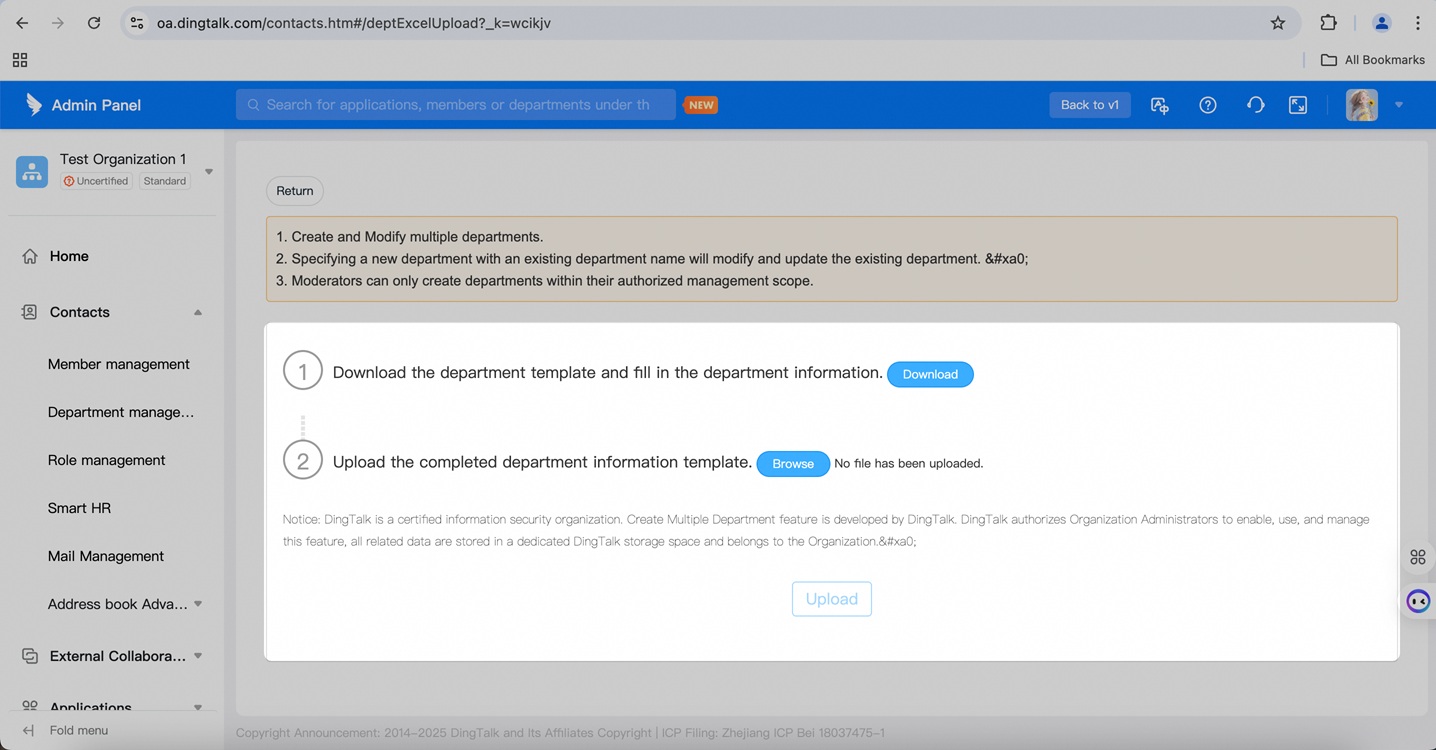
4. Go to Contacts > Department Management > Modify Department. You can download the template file for departments, fill in the department information, and upload it. To add departments individually, click Create Department on this page.
Mobile
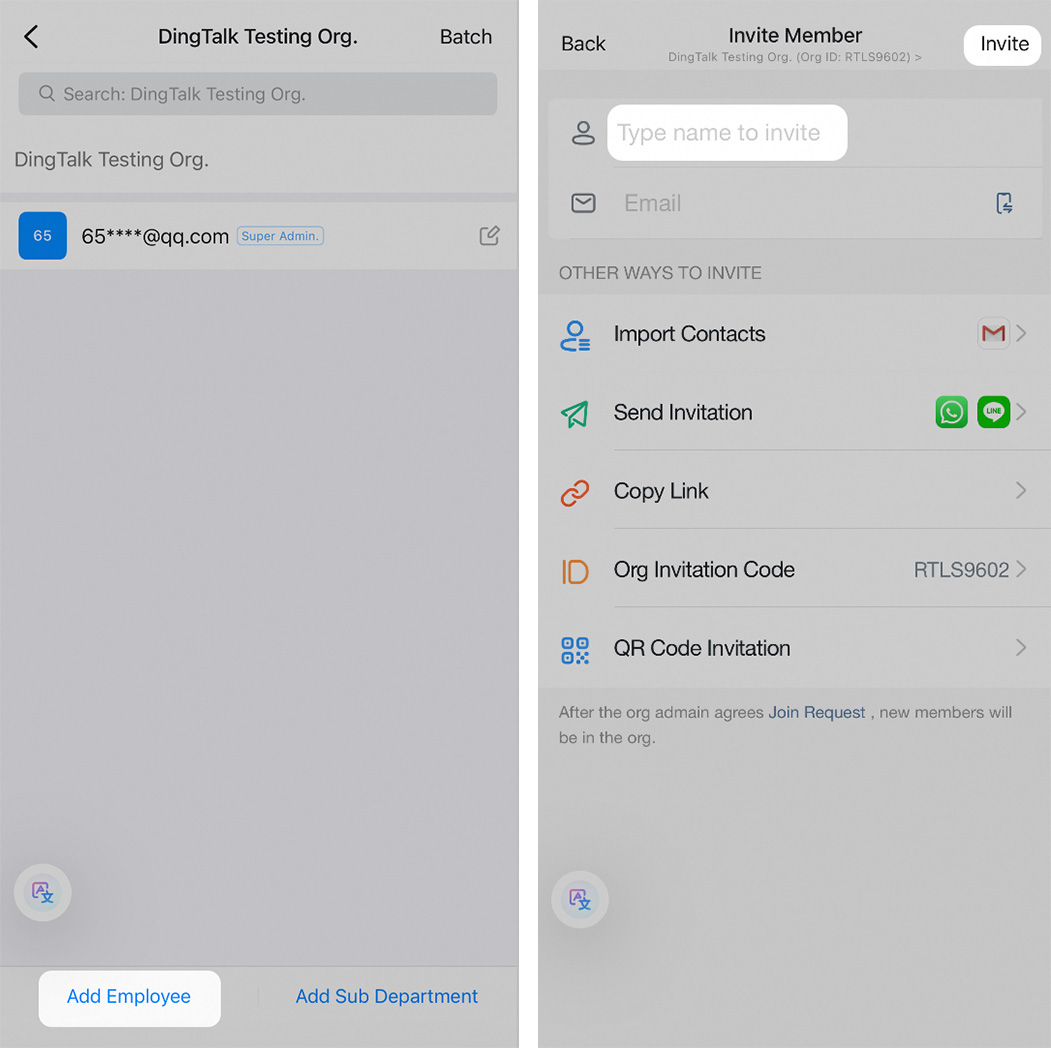
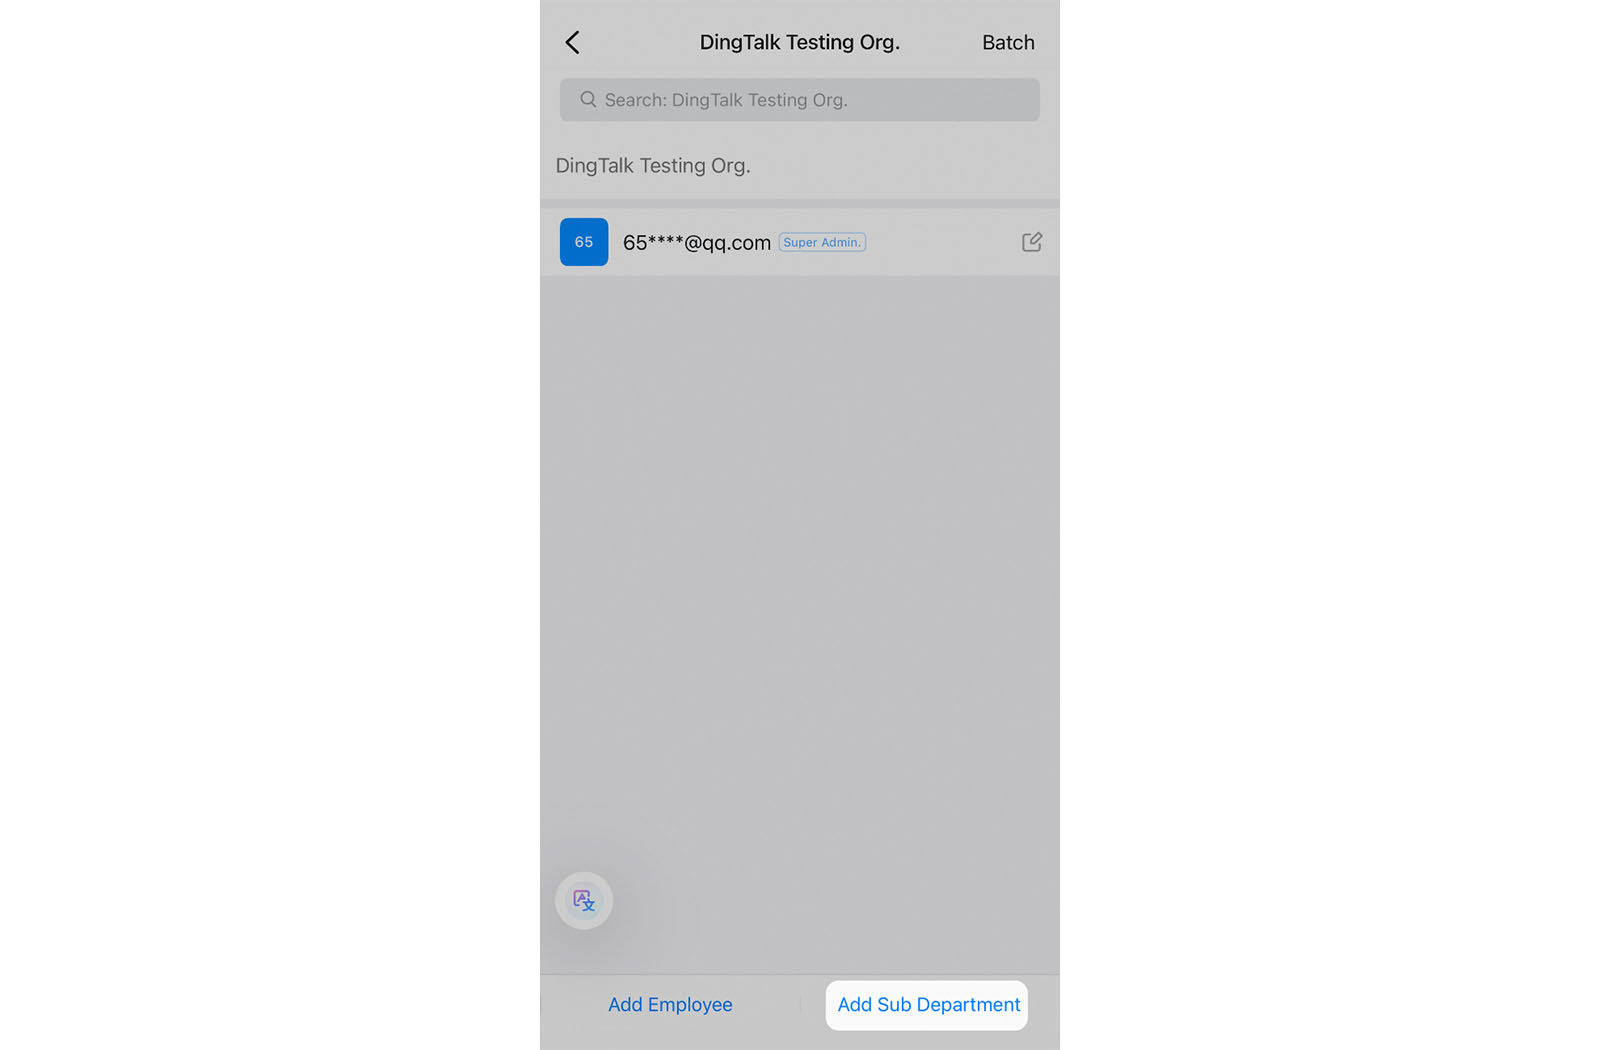
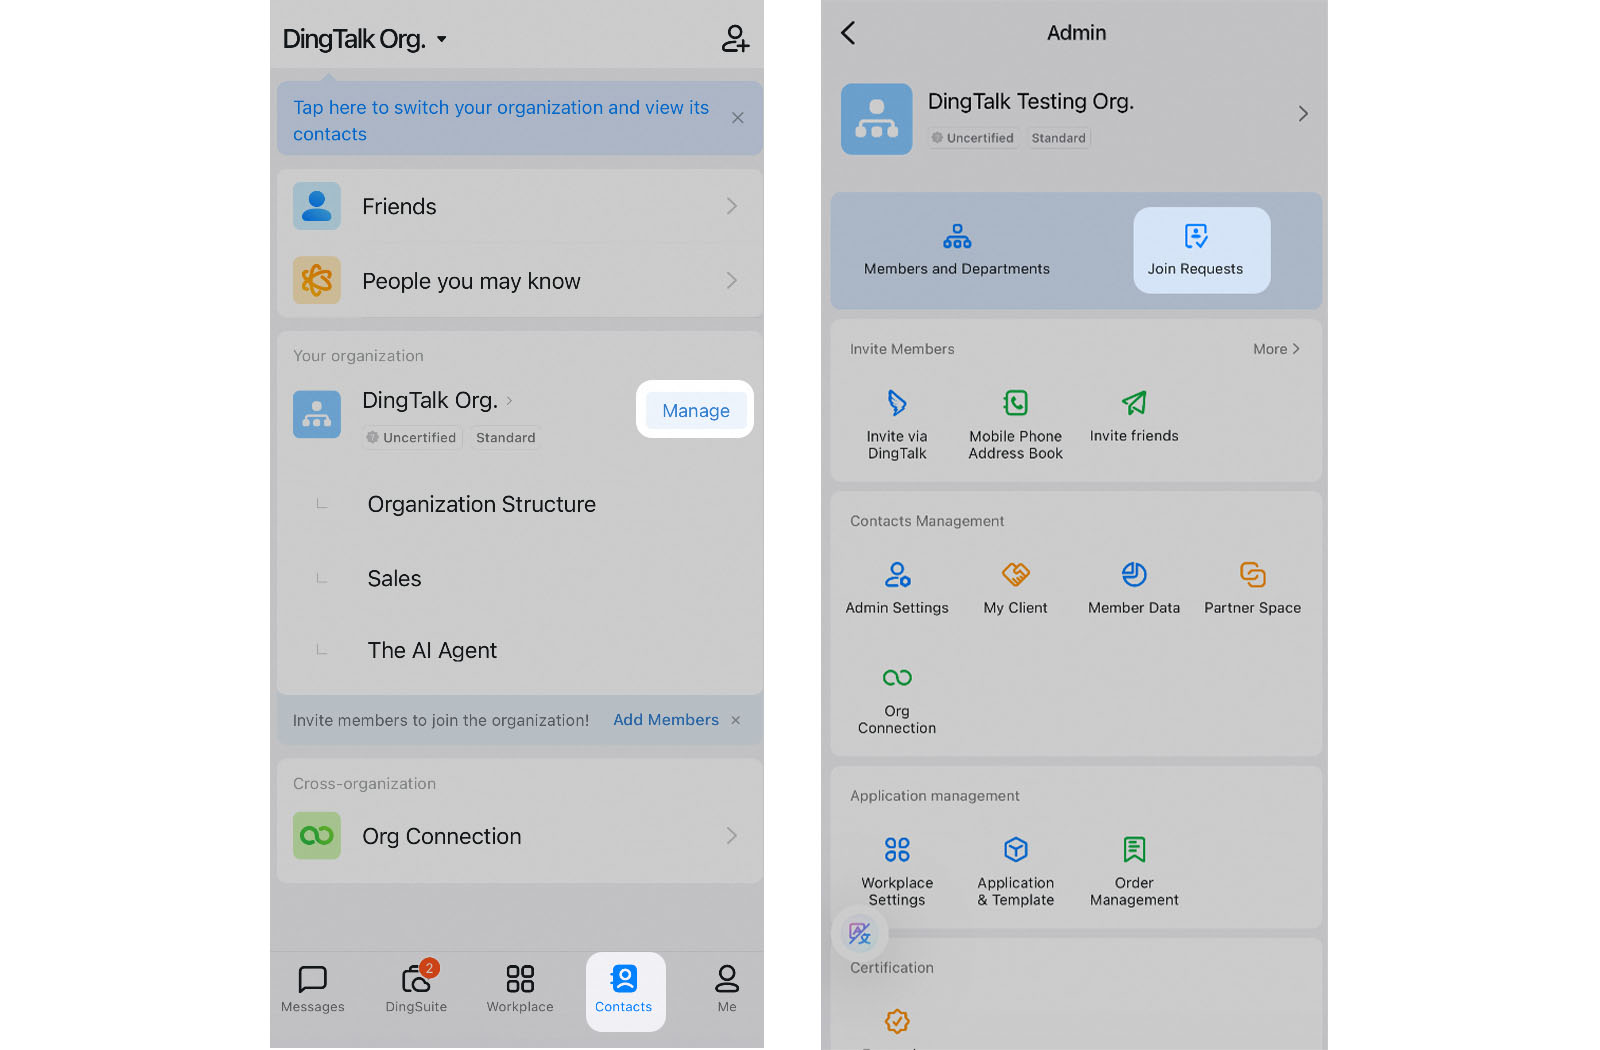
1. To add members, go to Contacts > Manage > Members and Departments.
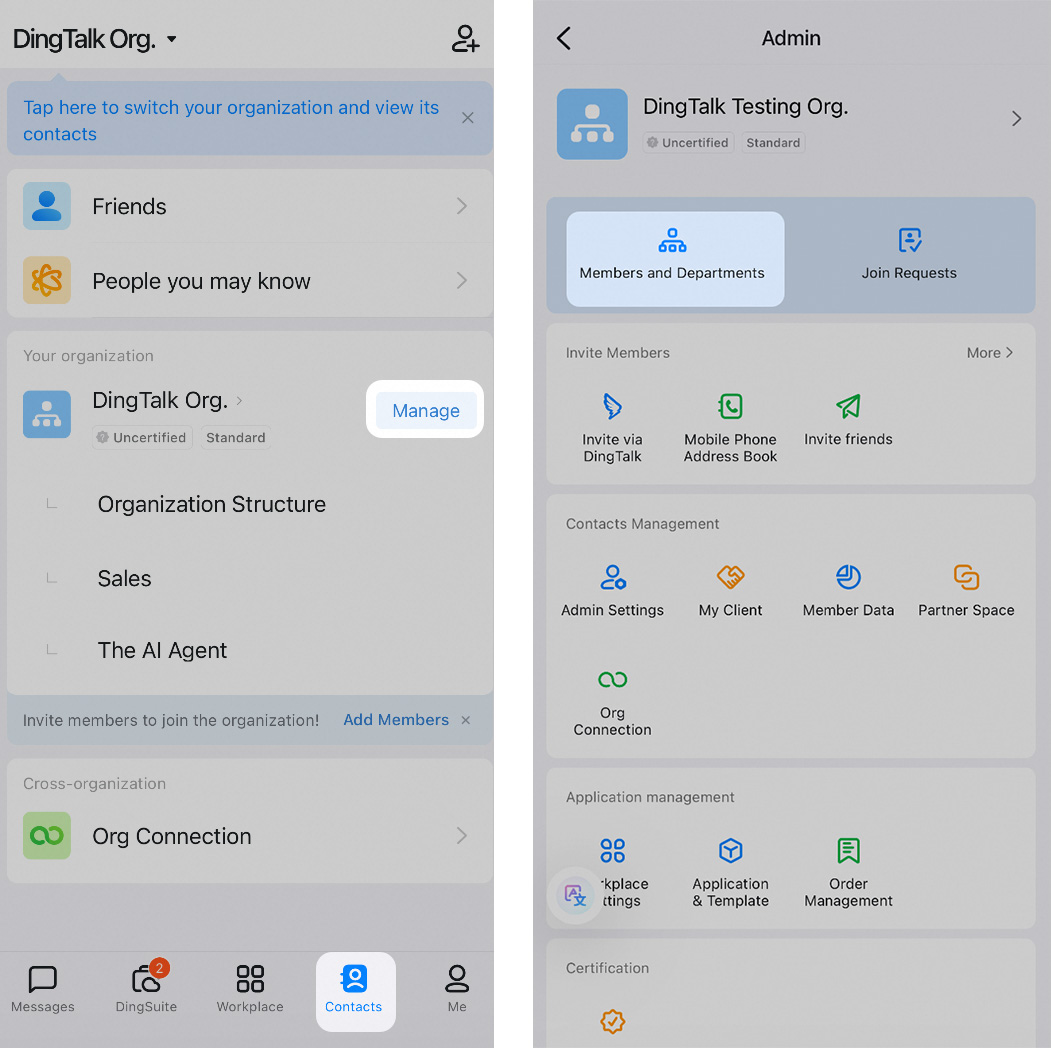
2. Click “Add Employees”. You can invite your members to join the organization in several ways.
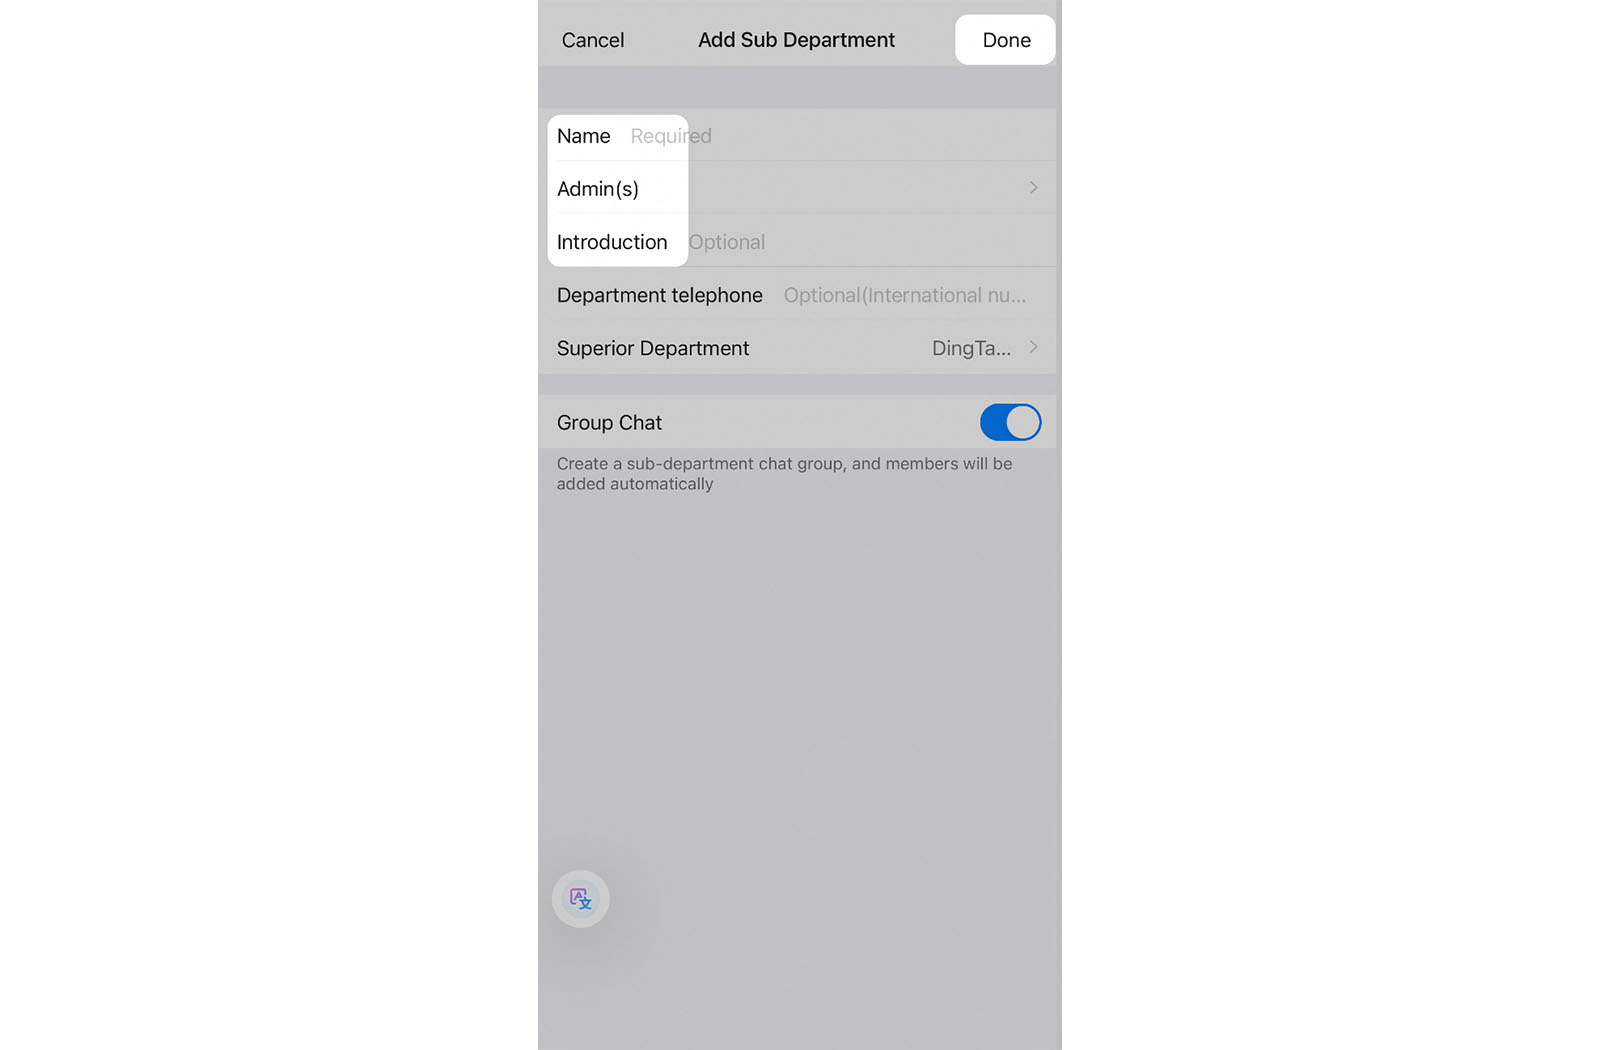
3. Click “Add Sub Department”.
4. Fill in the required information and tap “Done.” The department will then be created.
F. Set the Method for Joining the Organization
Mobile
Administrators have the ability to customize the join request form and specify how members can discover the organization, ensuring a secure and controlled process for joining.
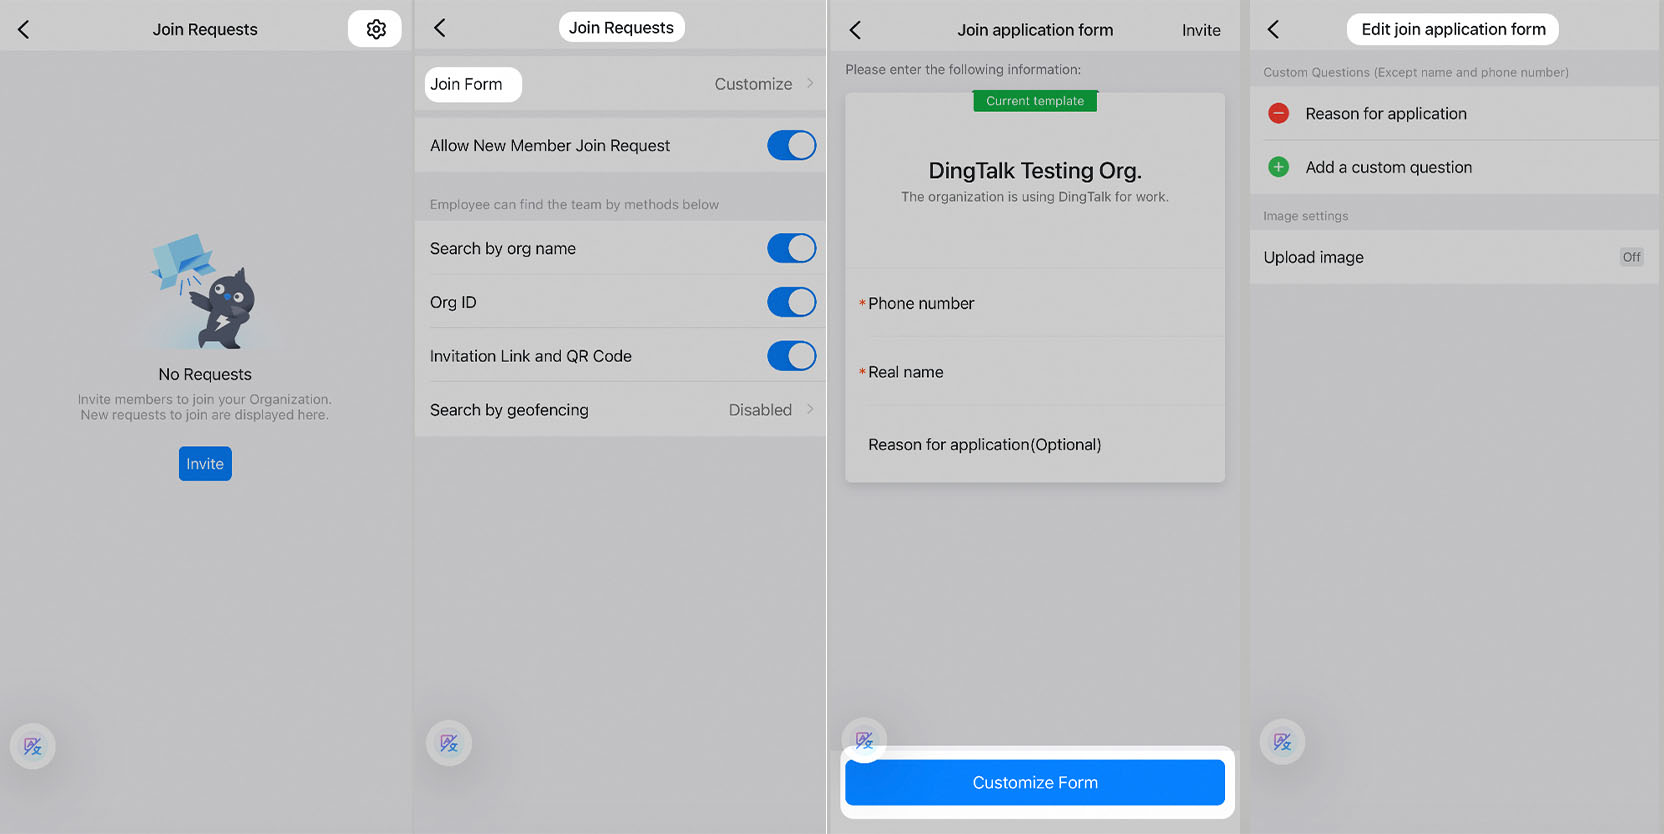
1. Go to Contacts > Manage > Join Requests.
2. Click the settings icon. From there, you can enable or disable the method by which others can find the organization. Additionally, you can customize the form for individuals applying to join the organization, ensuring it aligns with your requirements.
G. Assign Positions and Roles to Members
Desktop
DingTalk administrators can assign titles, positions, and roles to members across various departments, enhancing organization and improving overall collaboration within the team.
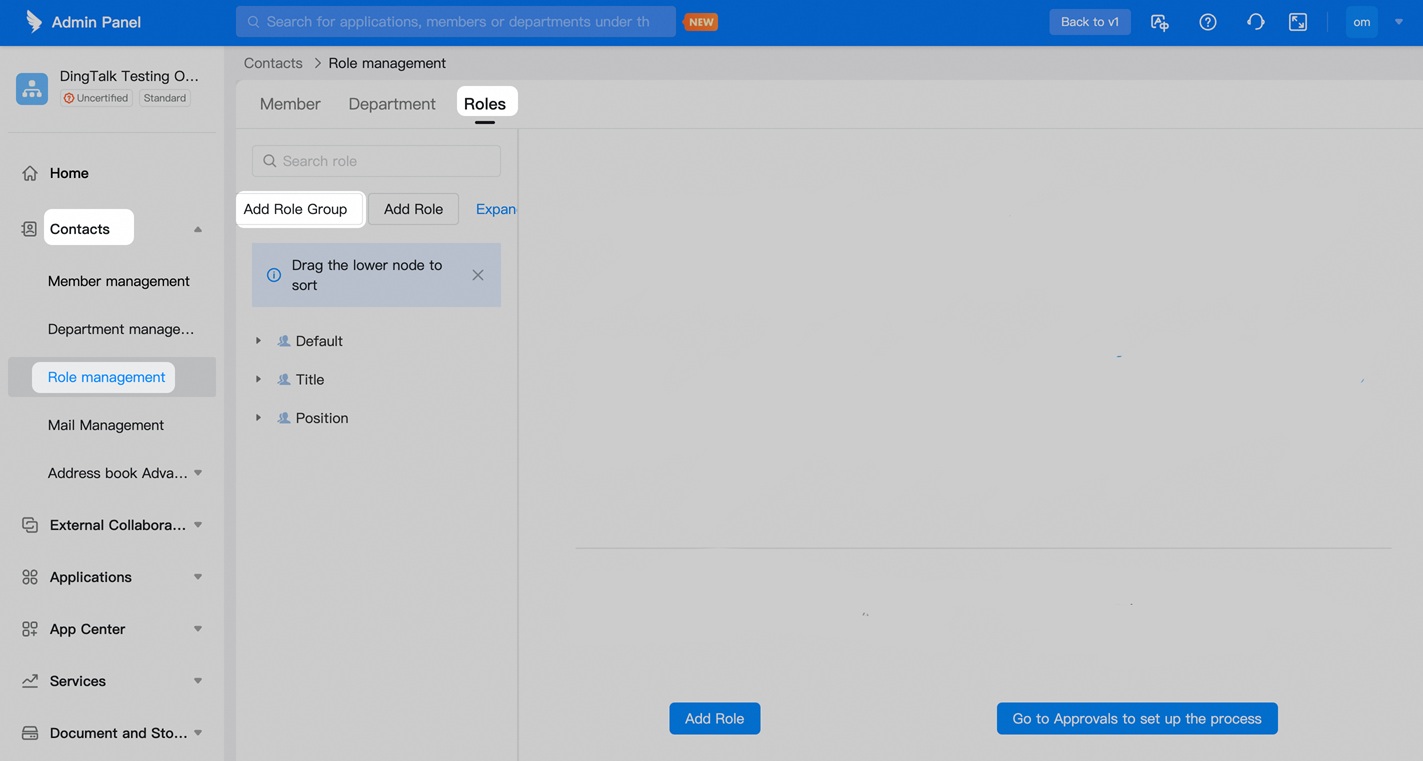
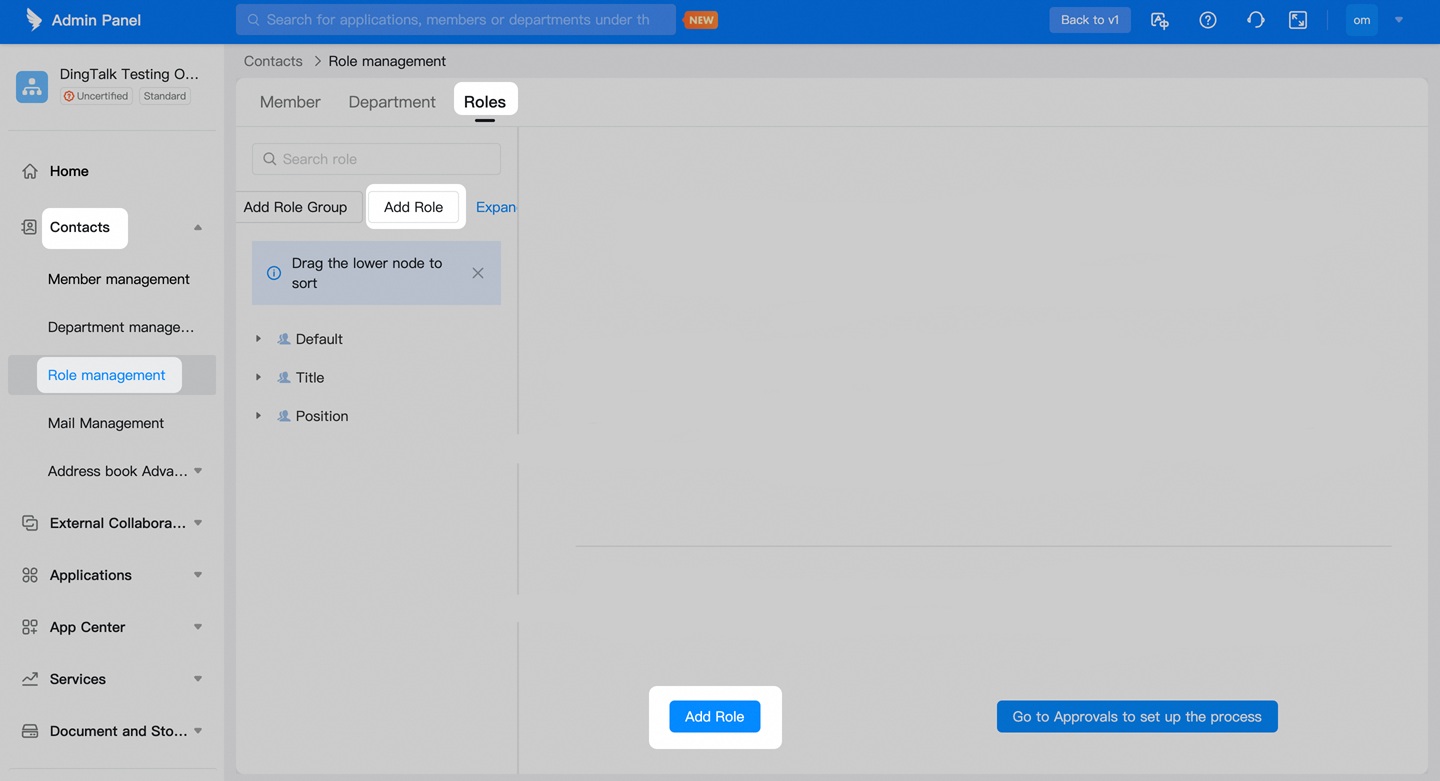
1. Access the Admin Console. Click on “More” and select “Management” in DingTalk to visit the webpage, or simply go to the website (oa.dingtalk.com). Select your organization and log in to the admin console.
2. Add Roles or Role Groups. Go to Contacts > Role Management > Add Role Group / Add Role. Enter the required information.
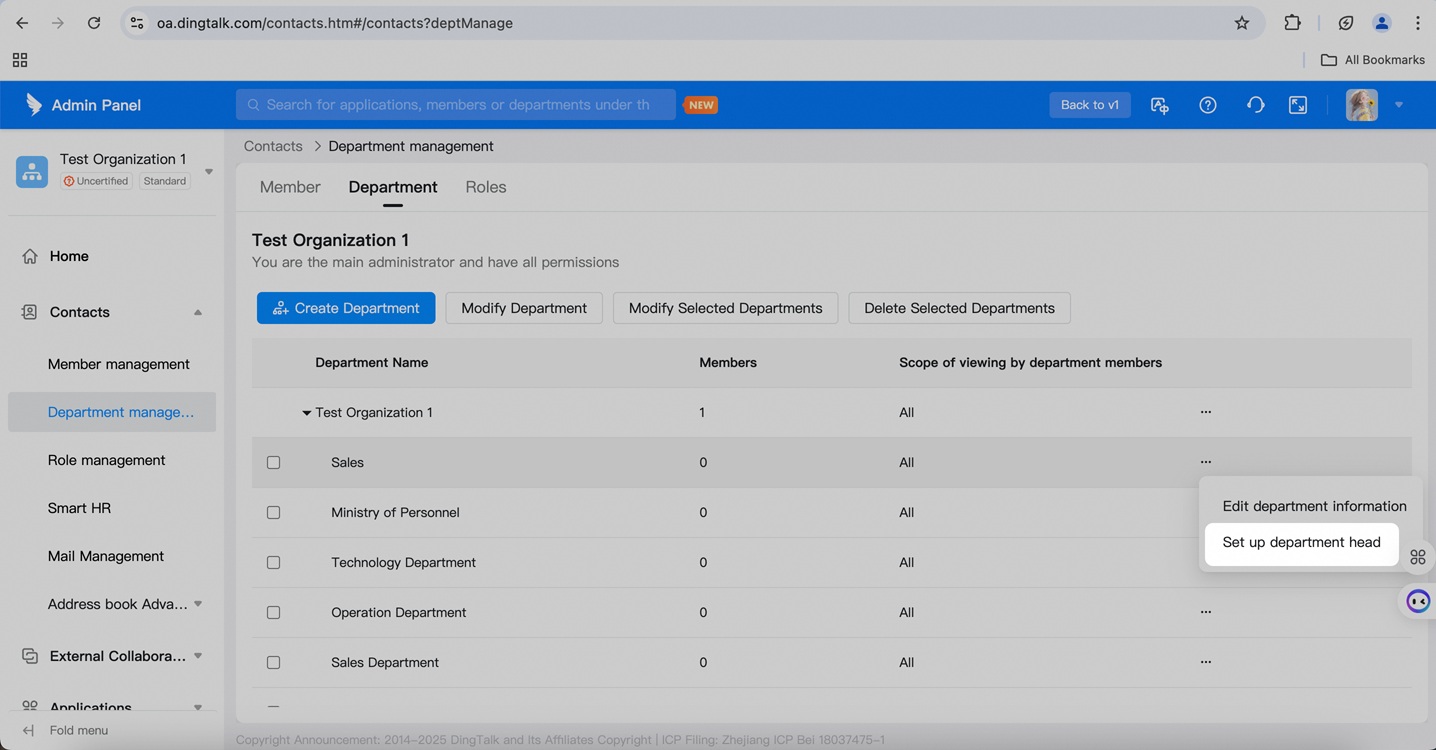
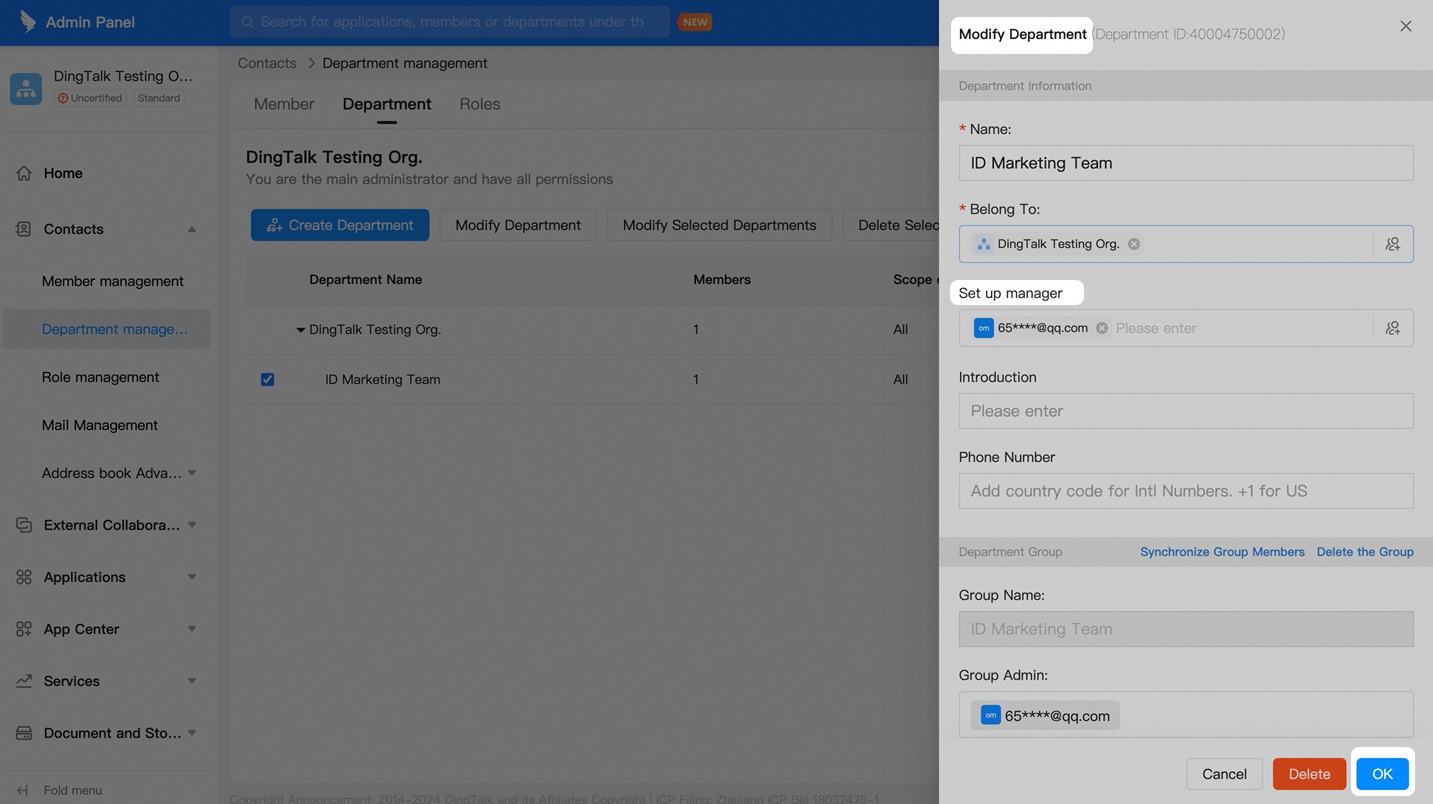
H. Assign Department Managers
Desktop
1. Access the Admin Console. In DingTalk, click “More” and select “Management” to navigate to the webpage, or visit the website directly at (oa.dingtalk.com). Select your organization and log in to the admin console.
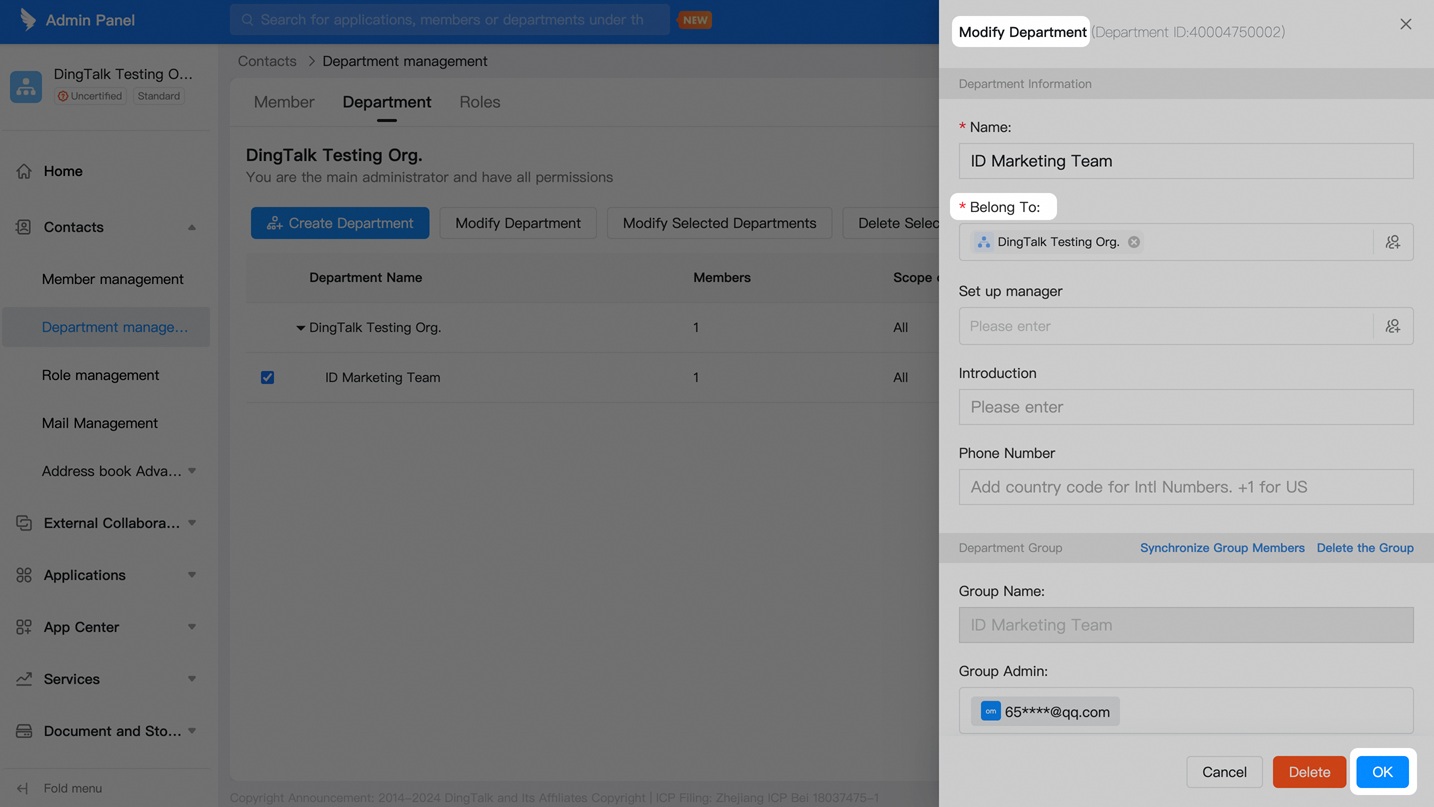
2. Assign Department Manager. Go to Contacts > Department Management, then select “Modify Selected Department.” Choose “Set Up Department Head” and assign the manager. Click “OK” to save the changes. This allows you to clearly define leadership roles within each department for better organization and oversight.
Mobile
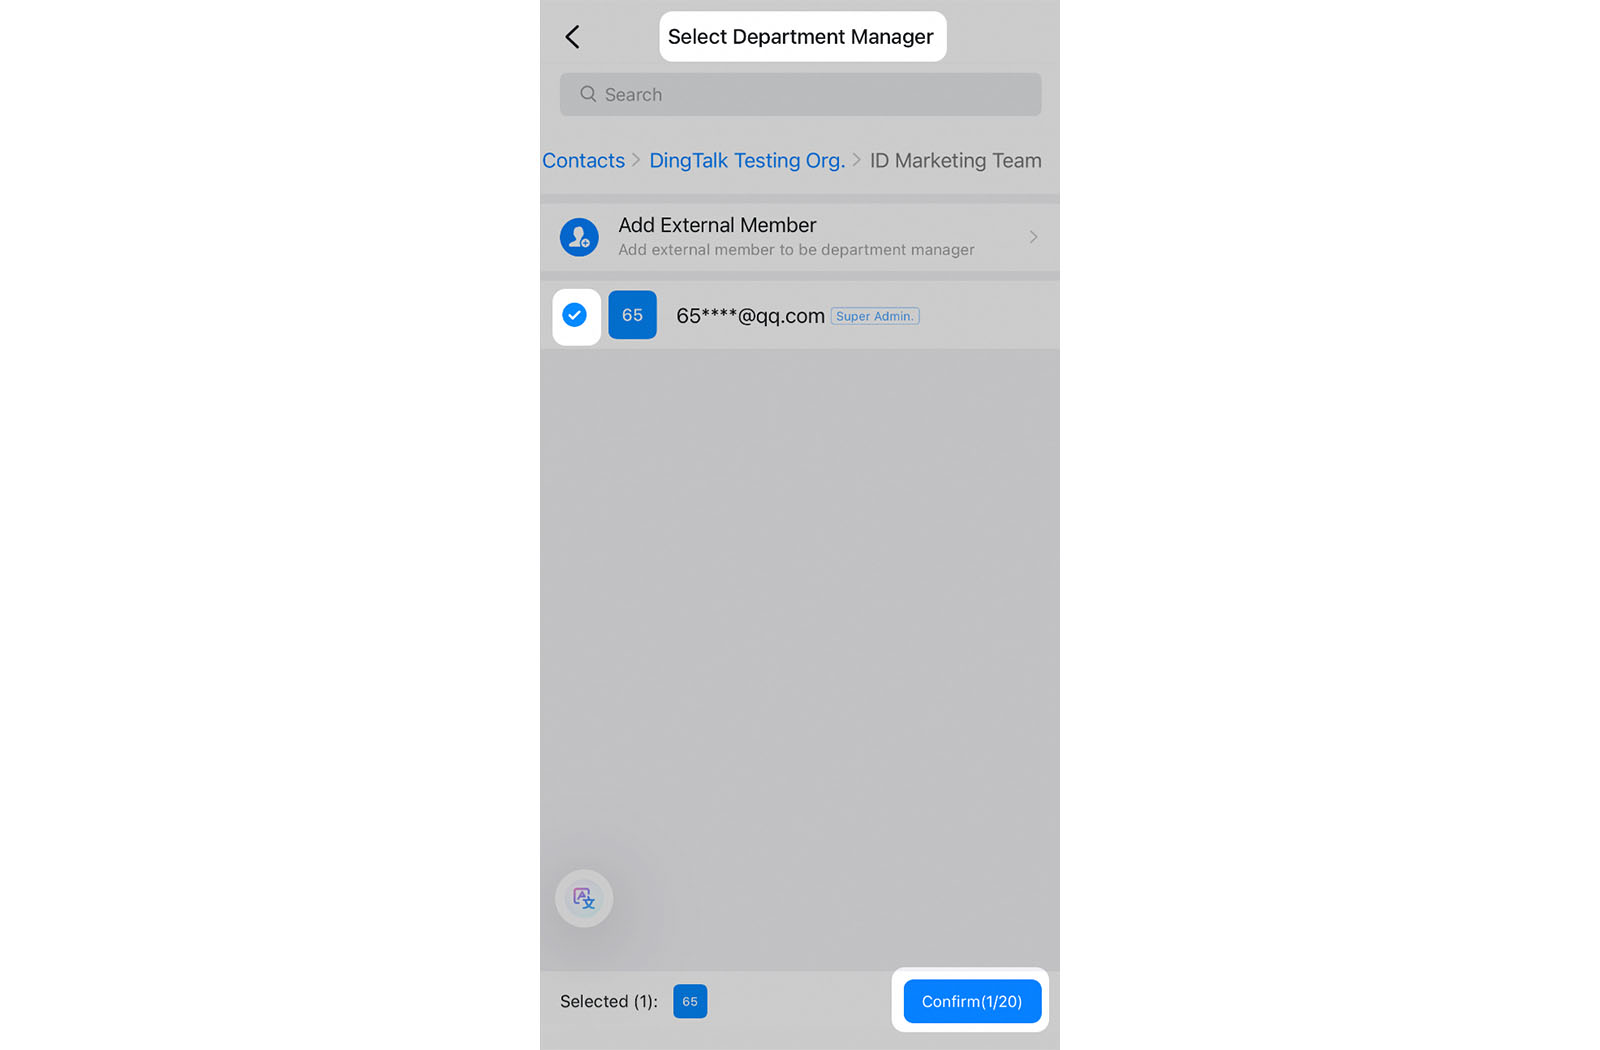
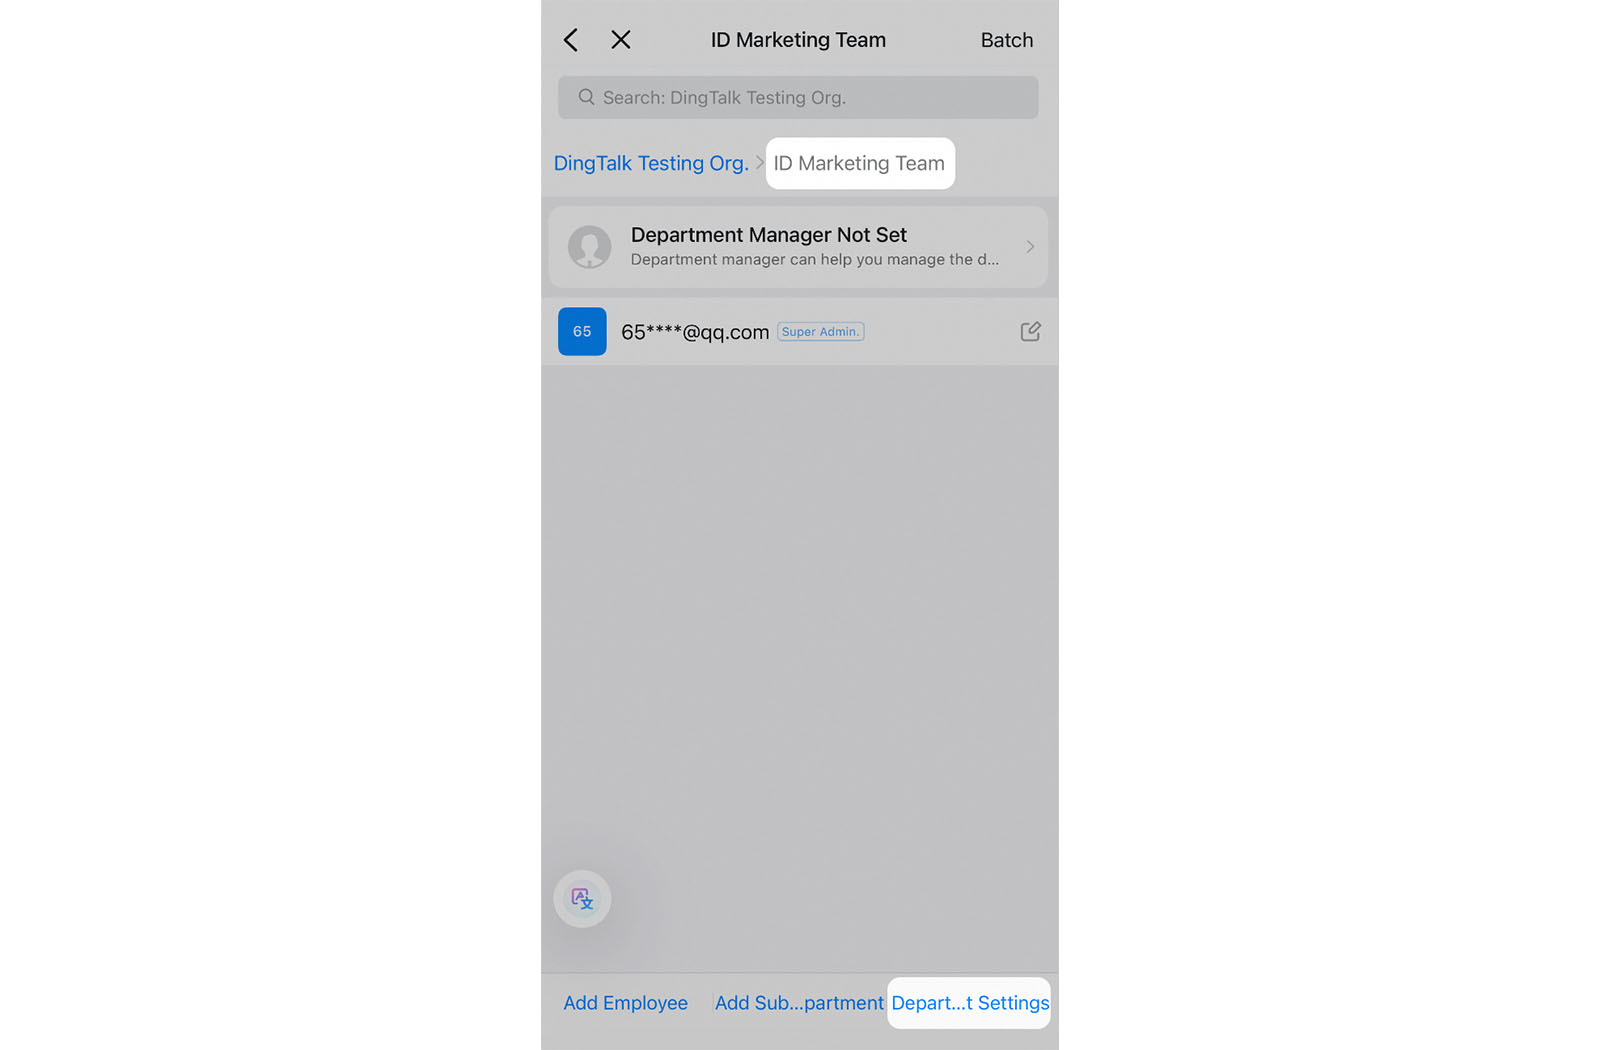
1. Go to Contacts > Manage > Members and Departments.
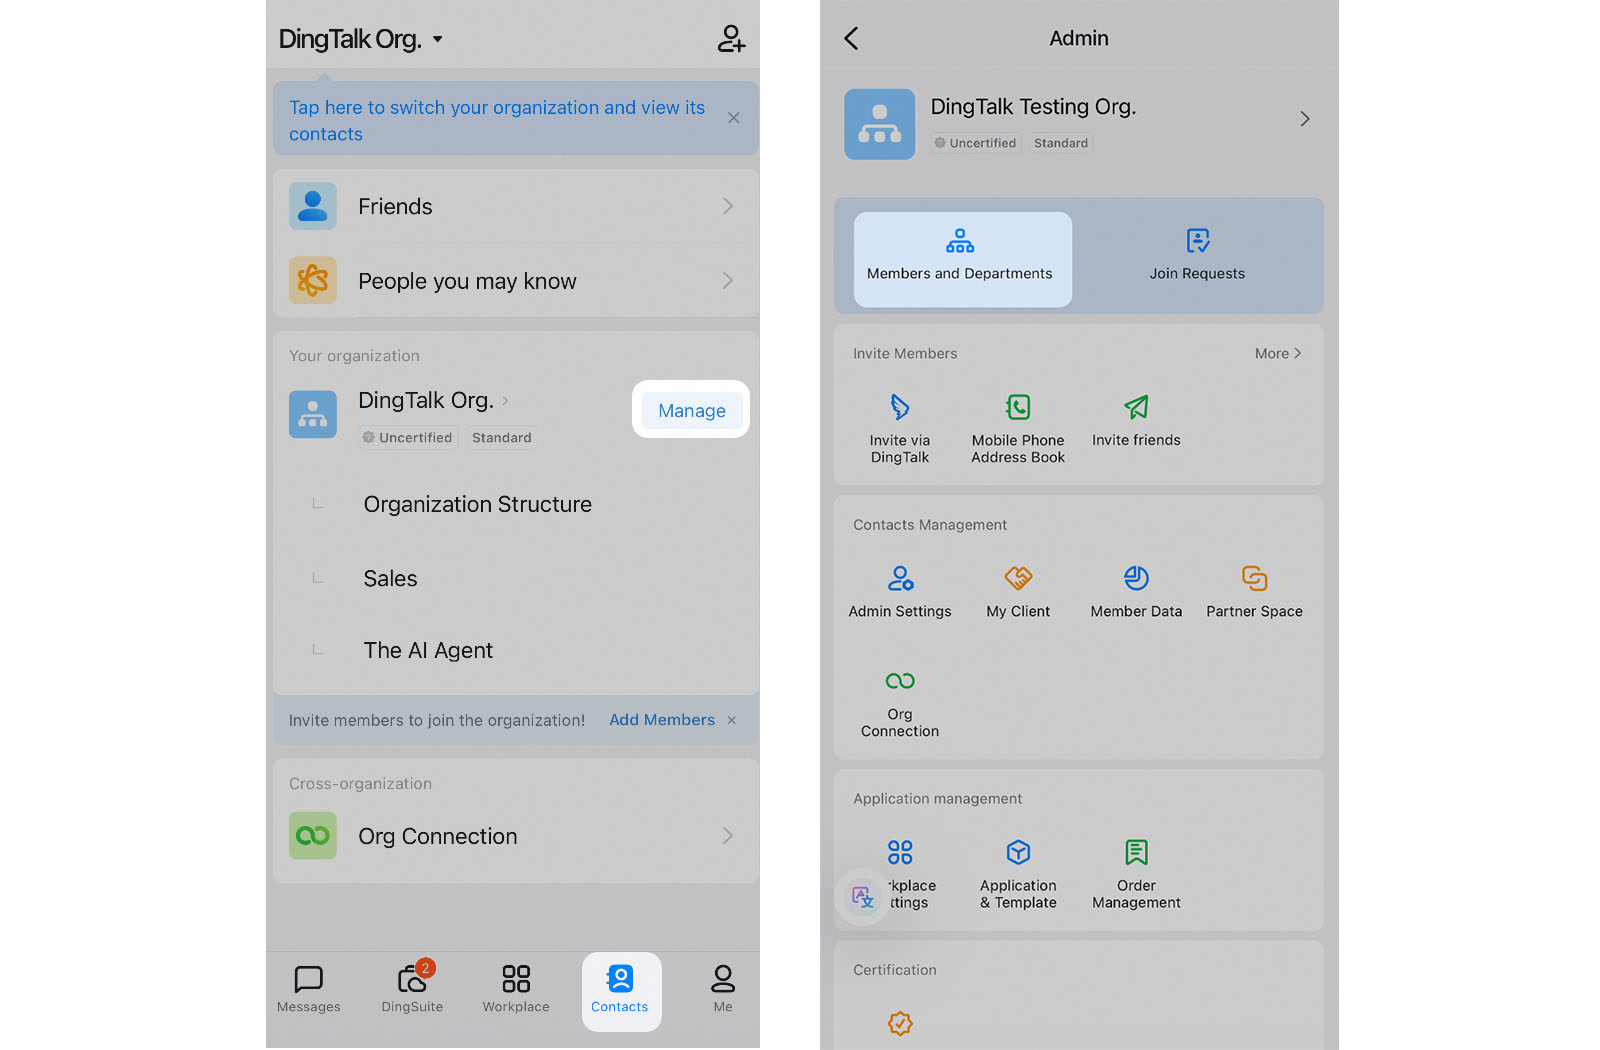
2. Choose a department and tap “Department Manager Not Set”.
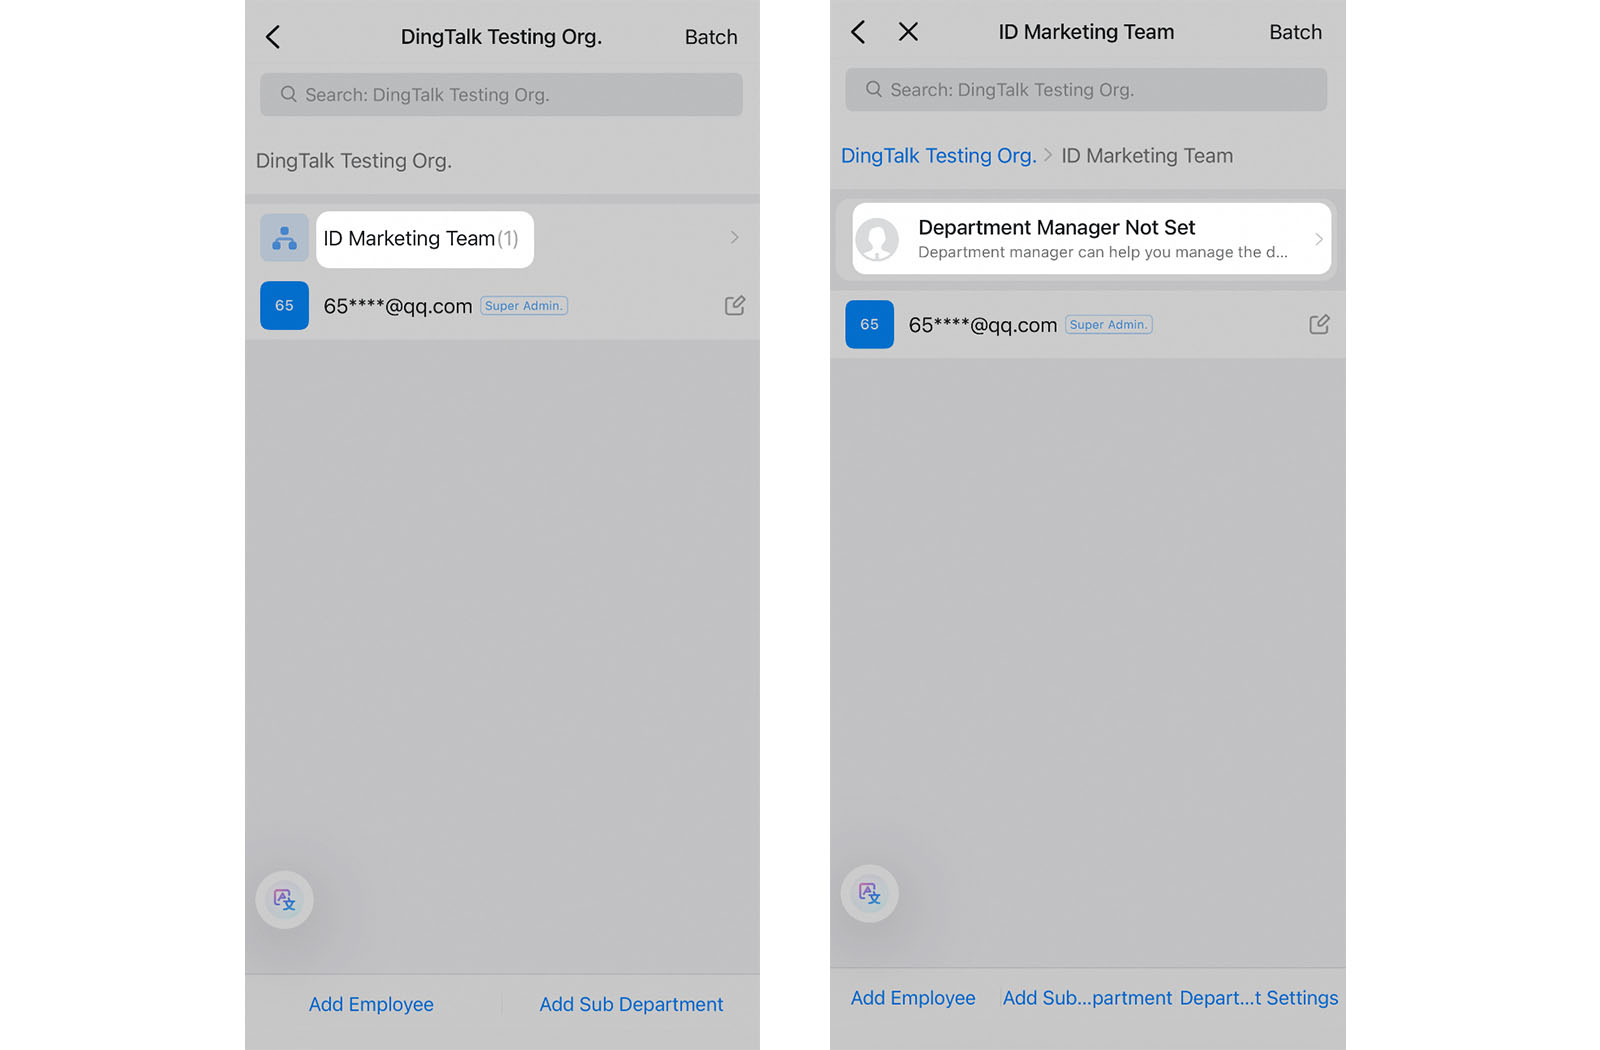
3. Choose the department manager and save the changes.
I. Change Organization for Departments
Desktop
You can set or modify the organization to which the department belongs.
1. Access the Admin Console. In DingTalk, click “More” and select “Management” to navigate to the webpage, or visit the website directly at (oa.dingtalk.com). Select your organization and log in to the admin console.
2. Change the Organization. Go to Contacts > Department Management > Modify Selected Department. Update the organization to which the department belongs.
Mobile
1. Go to Contacts > Manage > Members & Departments.
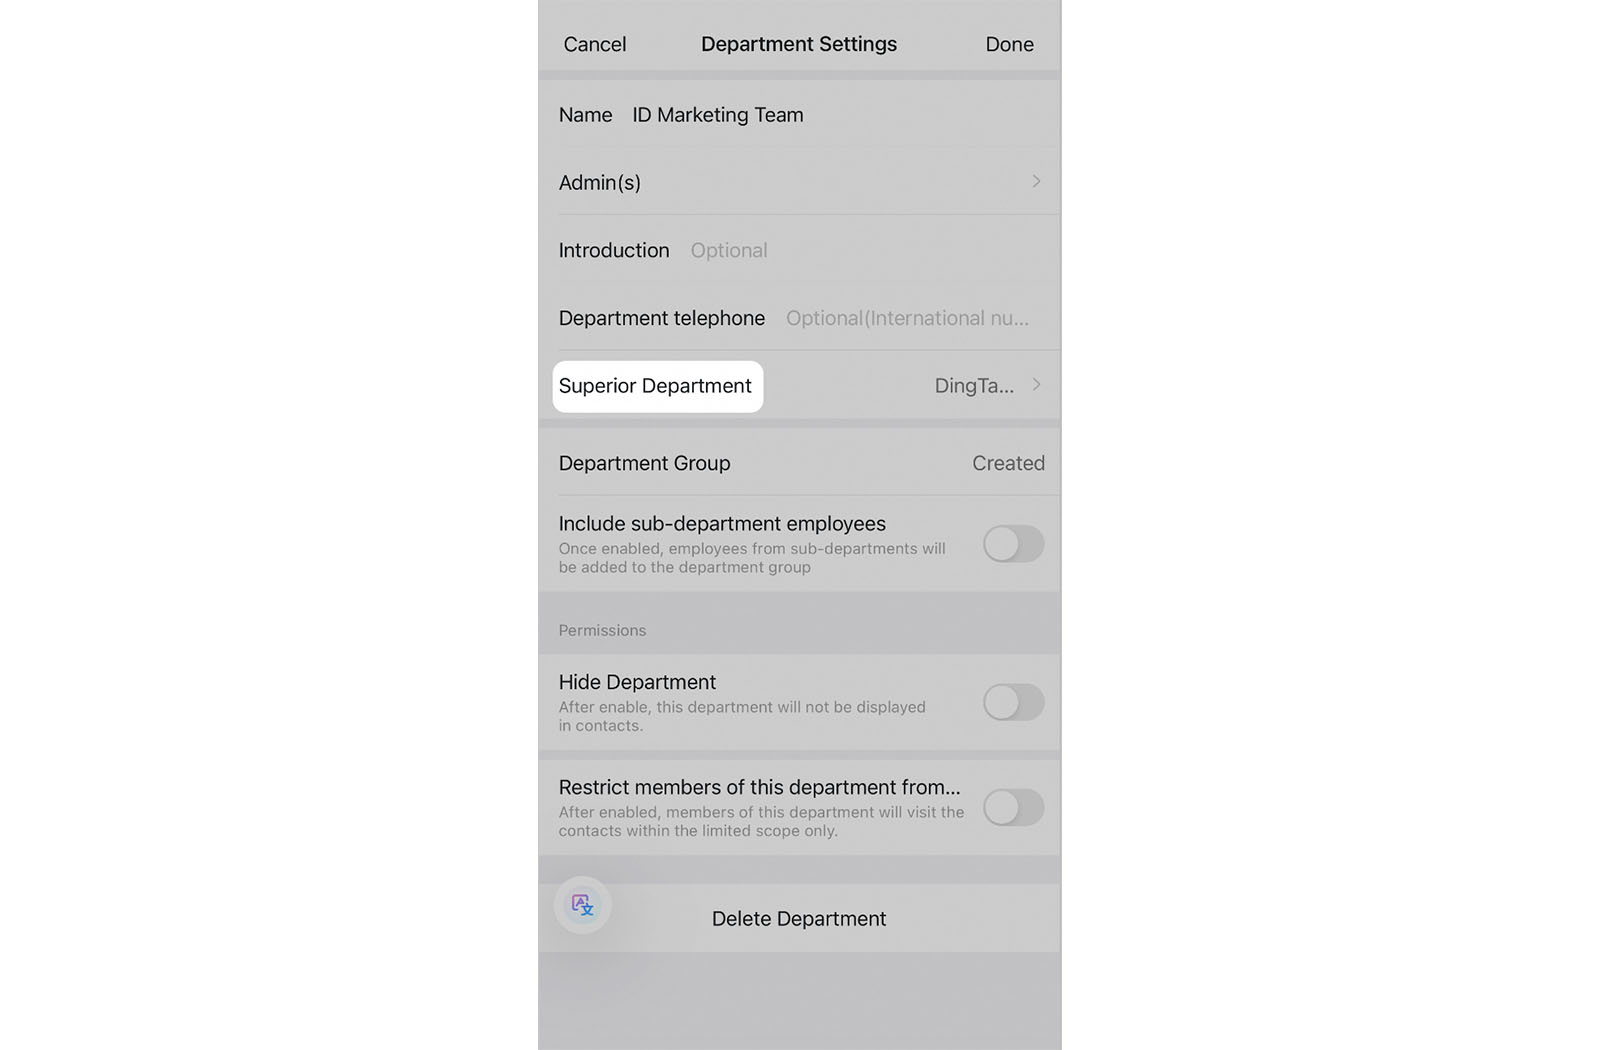
2. Choose the department and tap “Department Settings”.
3. Tap “Superior Department” to change the department's organization, allowing you to adjust its hierarchy and structure as needed.
J. Hide Departments
Desktop
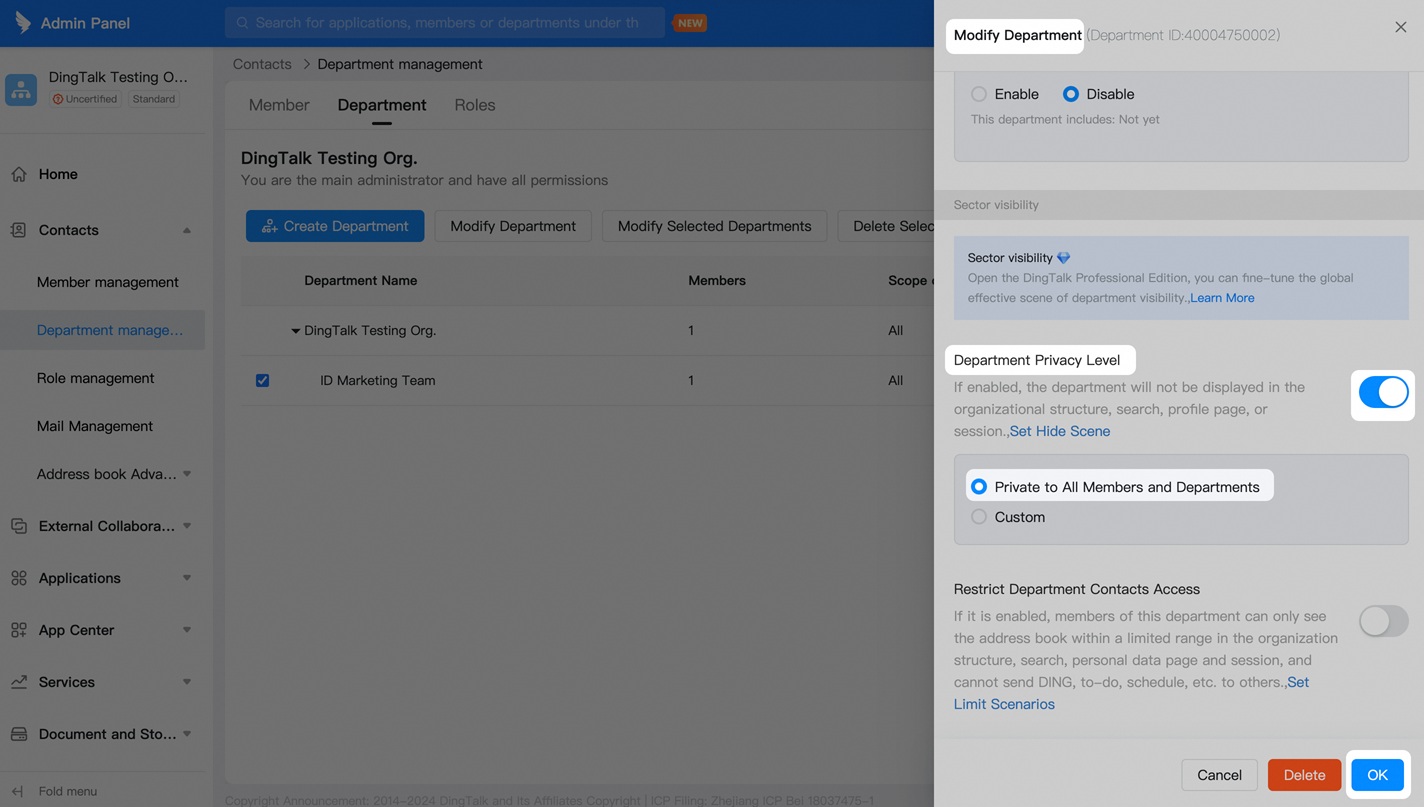
Hide departments with a high level of confidentiality to ensure information security. When a department is hidden, employees in other departments will not be able to view it in the Contacts section.
1. Access the Admin Console. In DingTalk, click “More” and select “Management” to navigate to the webpage, or visit the website directly at (oa.dingtalk.com). Select your organization and log in to the admin console.
2. Set Department Manager. Go to Contacts > Department Management > Modify Selected Department. Enable the privacy setting in the Department Privacy Level. If you select “Private to All Members and Departments,” members not in the department won't be able to see the department or its members in Contacts. You can also specify which individuals or groups are restricted from viewing it.
Mobile
1. Go to Contacts > Manage > Members & Departments.
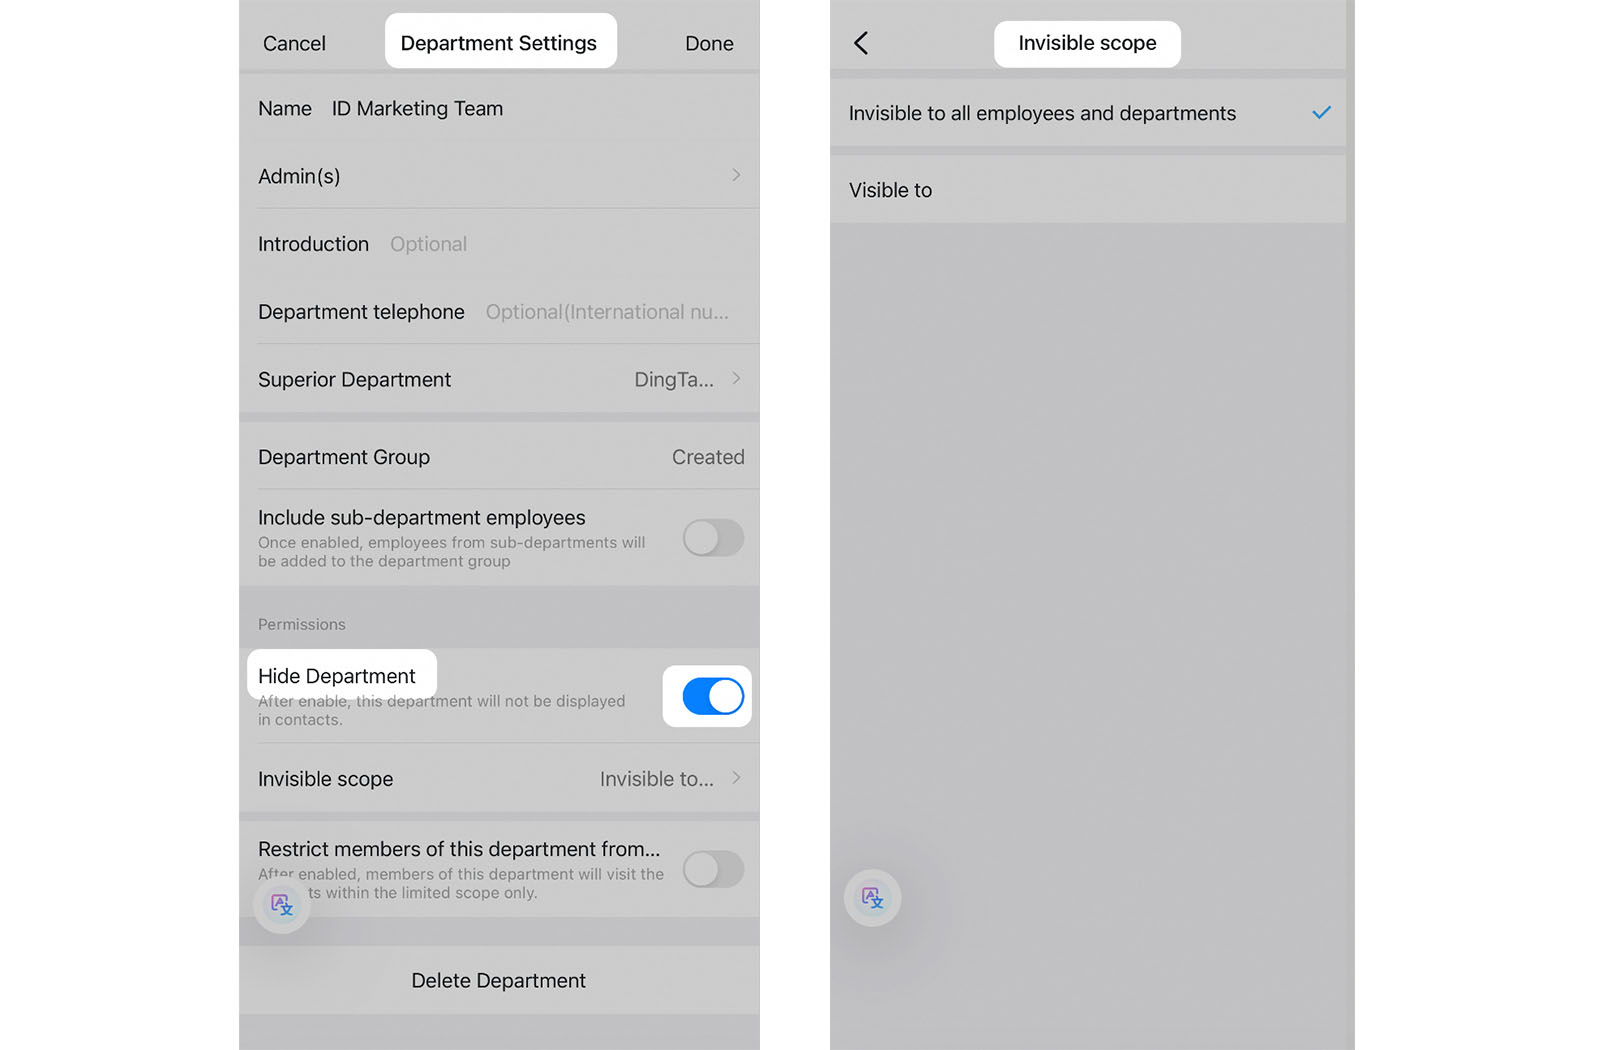
2. Choose the department and tap “Department Settings”.
3. Enable “Hide Department” to customize the visibility settings.
K. Configure Contact Visibility for Members
Desktop
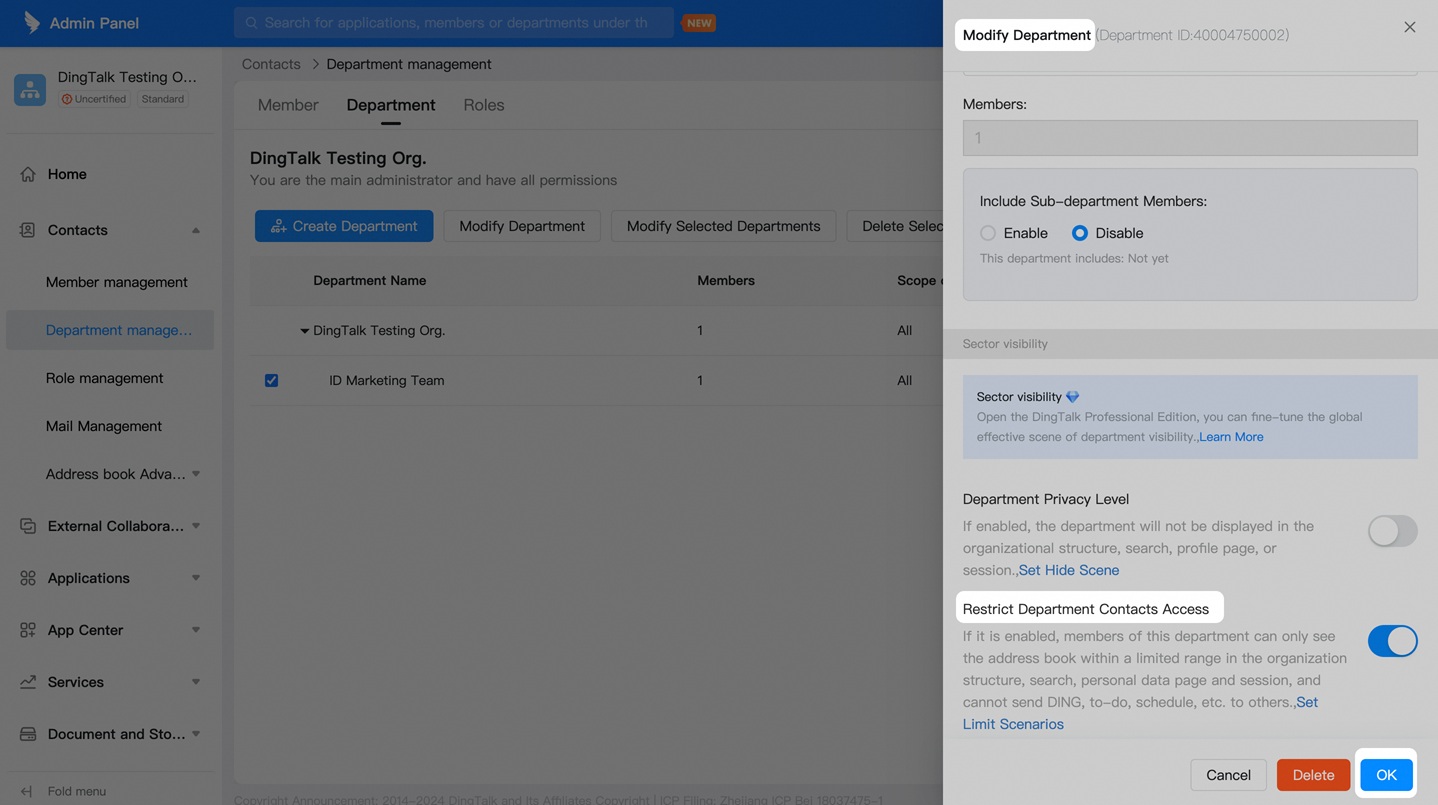
To prevent the leakage of contact information, large enterprises can enable restrictions, limiting department members' access to Contacts.
1. Access the Admin Console. In DingTalk, click “More” and select “Management” to navigate to the webpage, or visit the website directly at (oa.dingtalk.com). Select your organization and log in to the admin console.
2. Set Department Contact Access. Go to Contacts > Department Management > Modify Selected Department. Enable “Restrict Department Contact Access.”
Mobile
1. Go to Contacts > Manage > Members & Departments.
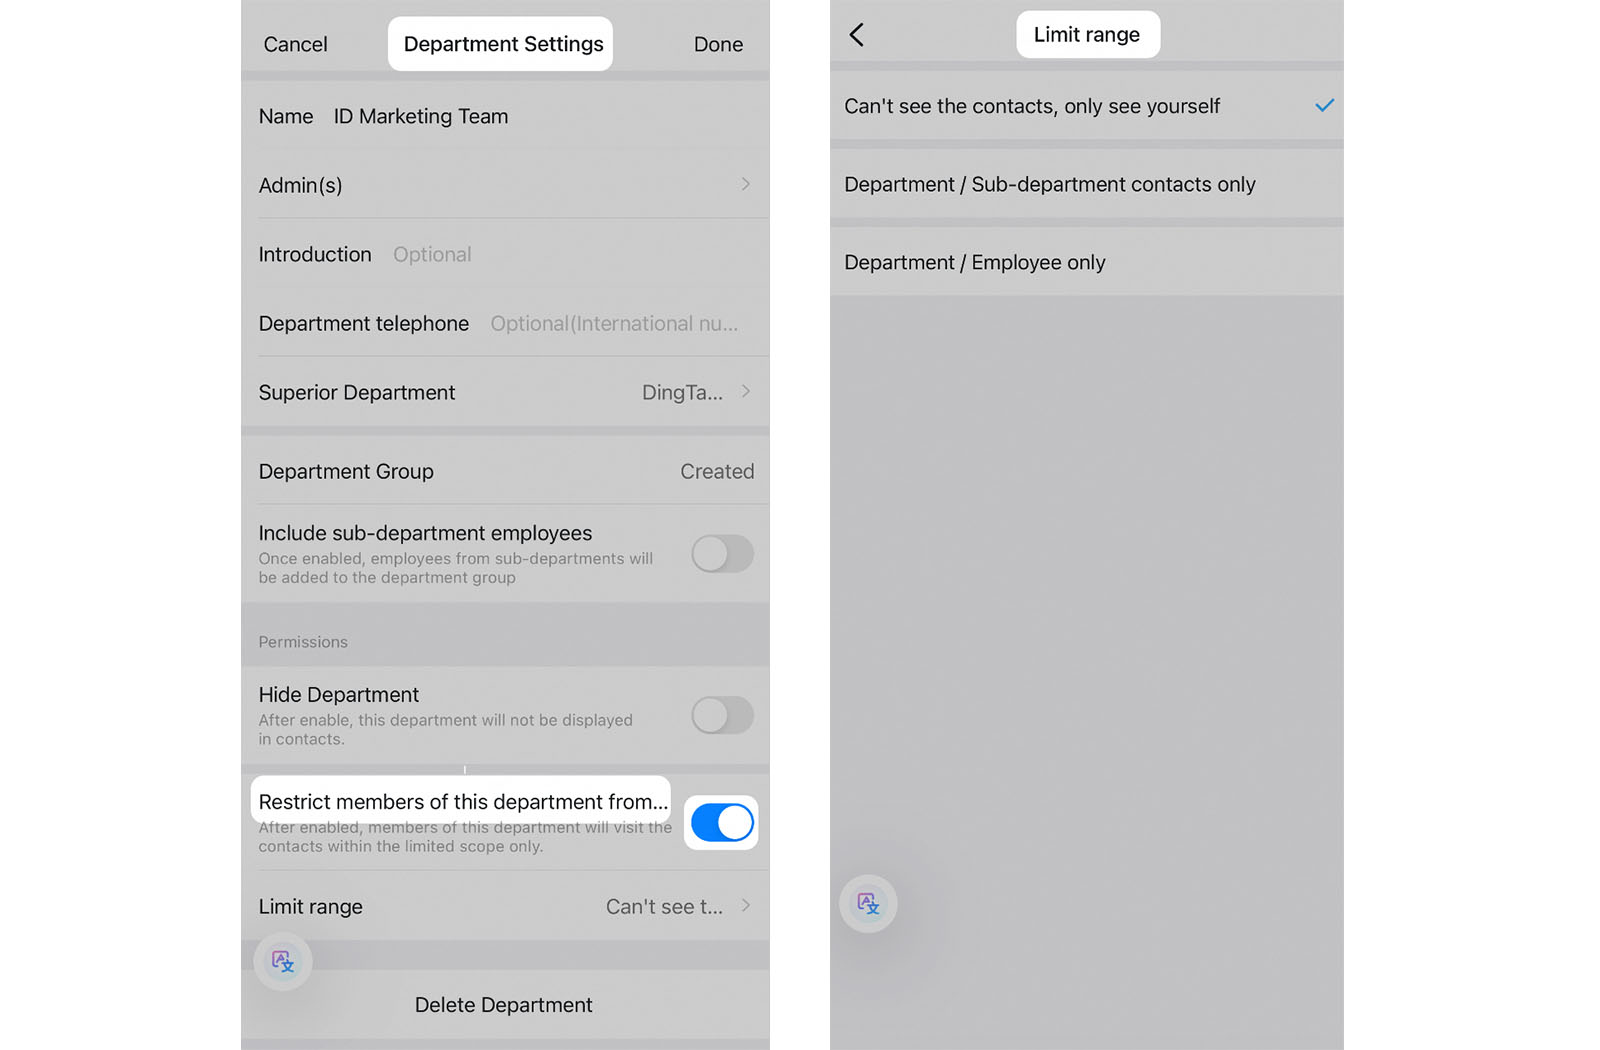
2. Choose the department and tap “Department Settings”.
3. Enable “Restrict members of this department from viewing the Contacts”. You can customize which profiles are accessible to members within the department, ensuring control over sensitive information and privacy.
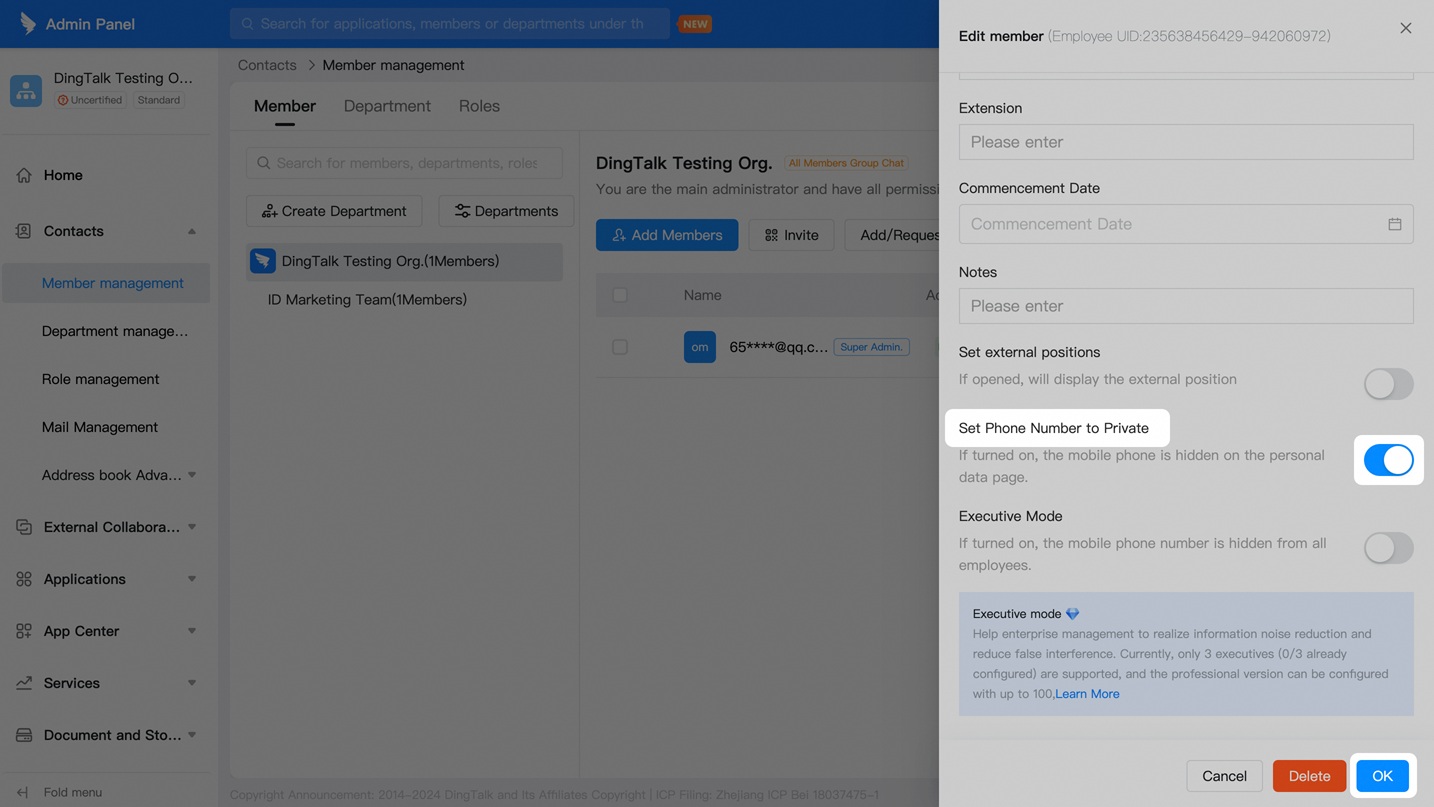
L. Keep Members’ Phone Numbers Private
Desktop
If you prefer not to display the phone numbers of key members, such as C-suite executives, to other employees, the administrator has the option to hide their contact details.
1. Access the Admin Console. In DingTalk, click “More” and select “Management” to navigate to the webpage, or visit the website directly at (oa.dingtalk.com). Select your organization and log in to the admin console.
2. Hide Phone Numbers. To hide a member's phone number, go to “Member Management”, select the desired members, click “More”, and choose “Edit Information”. Then, enable “Set Phone Number” to Private. Once enabled, the phone number will no longer appear on the member's profile.
Mobile
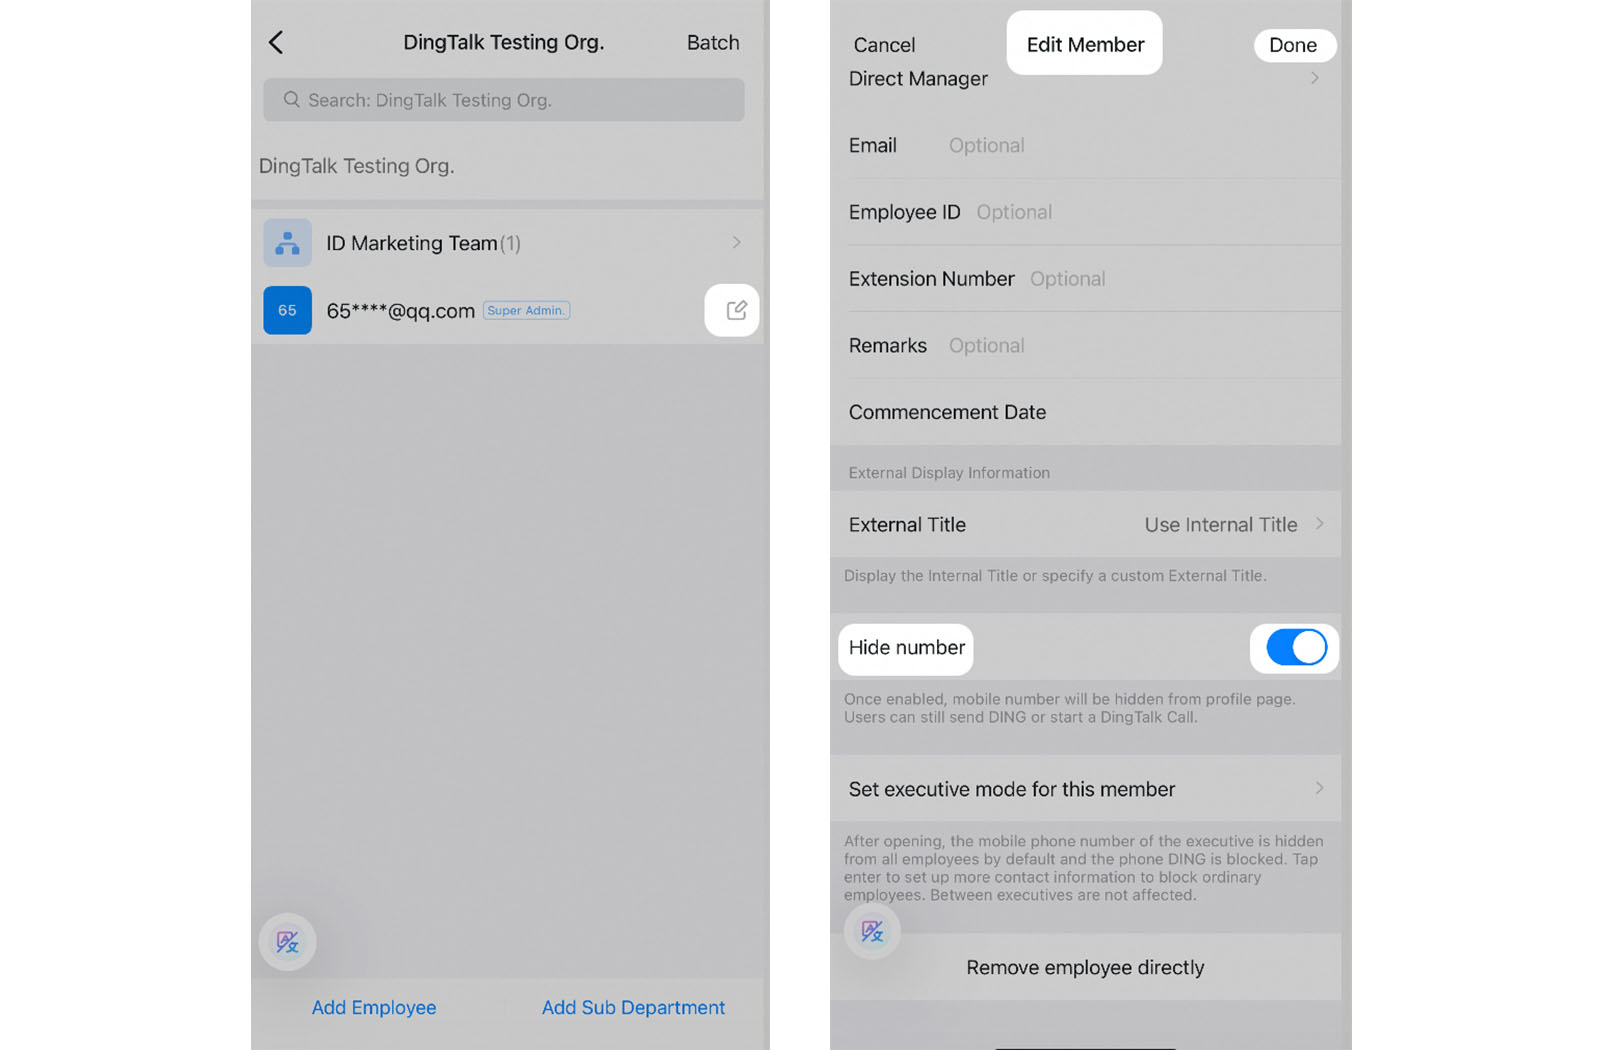
1. Go to Contacts > Manage > Members & Departments.
2. Locate the member and tap the edit icon. Enable ‘Hide Number'.
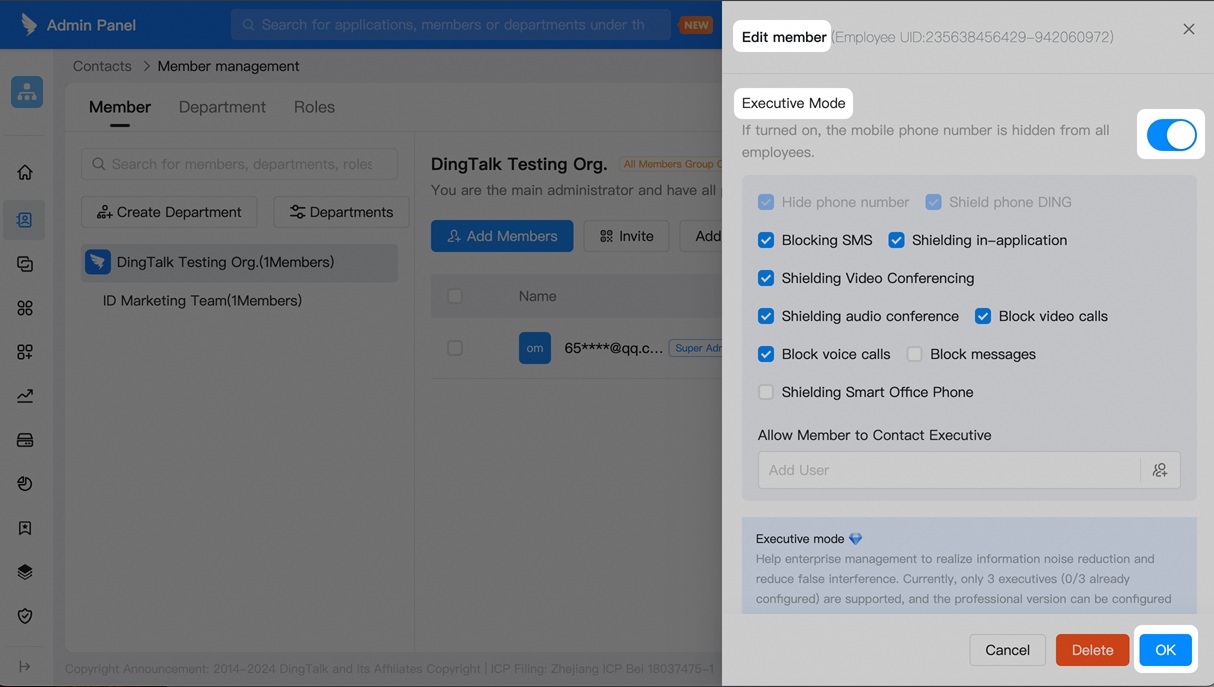
M. Turn on Executive Mode
Desktop
Executive Mode is a feature designed to protect the privacy of senior managers within an organization. When enabled, it hides their mobile phone numbers and restricts employees from sending DING messages, making business calls, or initiating similar communications with them.
1. Access the Admin Console. In DingTalk, click “More” and select “Management” to navigate to the webpage, or visit the website directly at (oa.dingtalk.com). Select your organization and log in to the admin console.
2. Select the member and activate Executive Mode. Go to Contacts > Member Management, choose the member, and edit their details. Enable Executive Mode and choose which messages to block.
Mobile
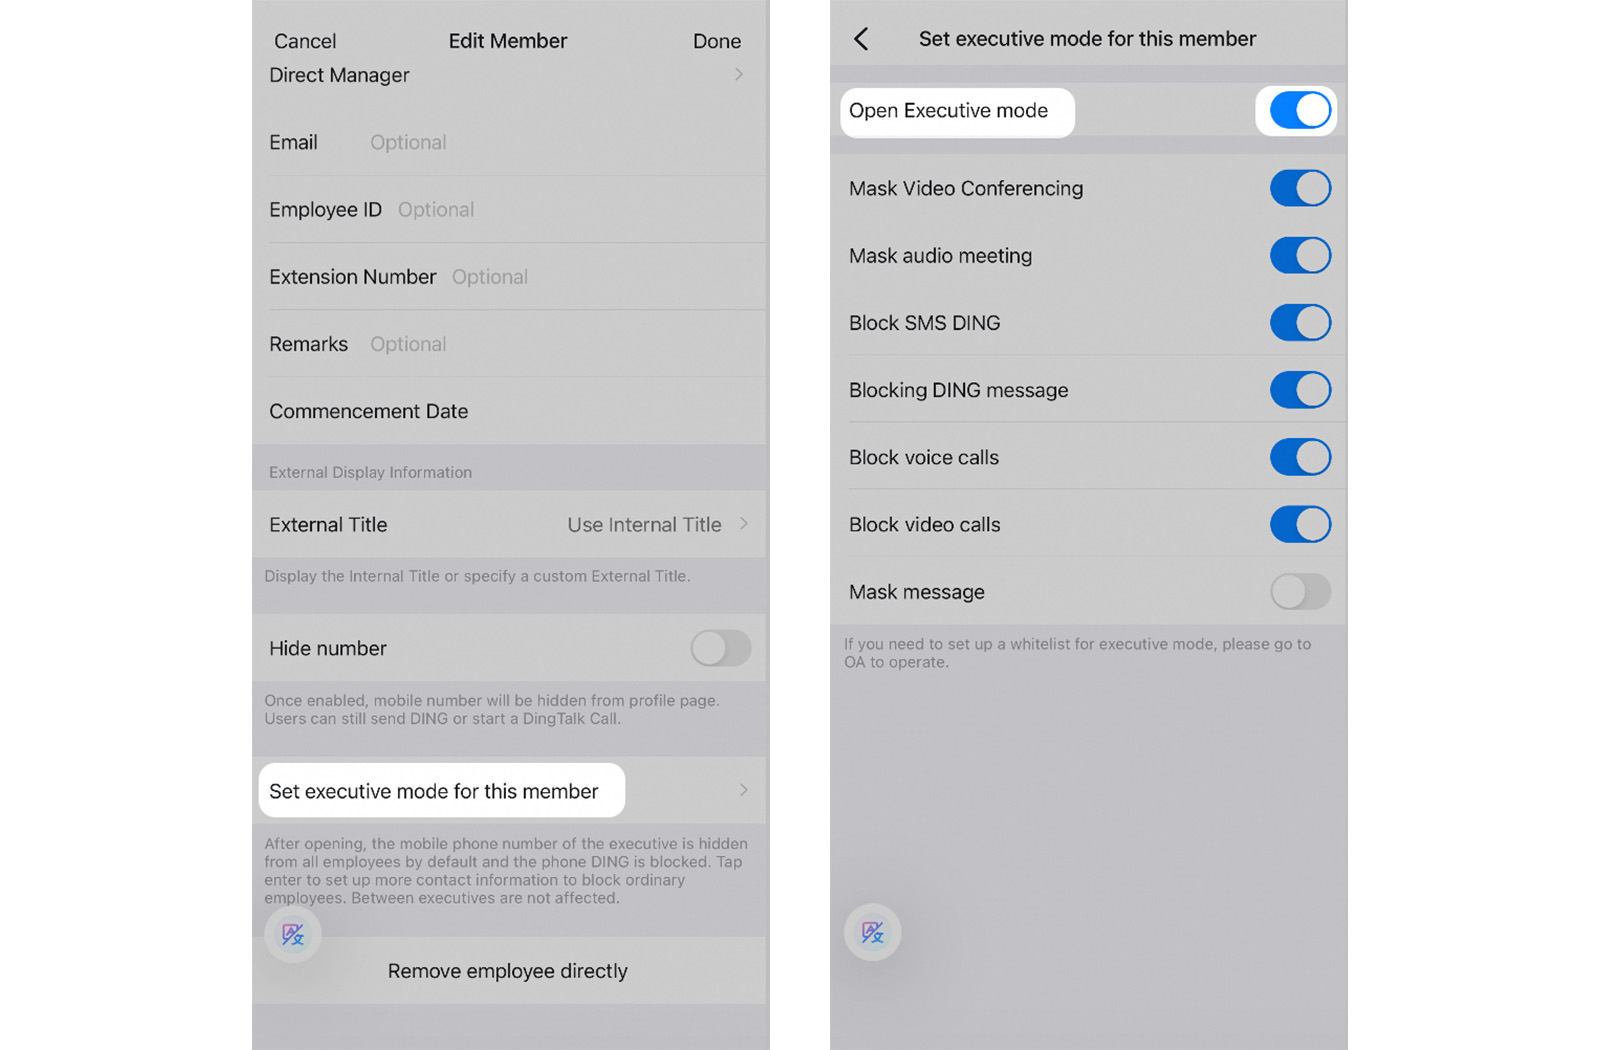
1. Go to Contacts > Manage > Members & Departments.
2. Locate the employee and edit their member information. Enable Executive Mode for this member.
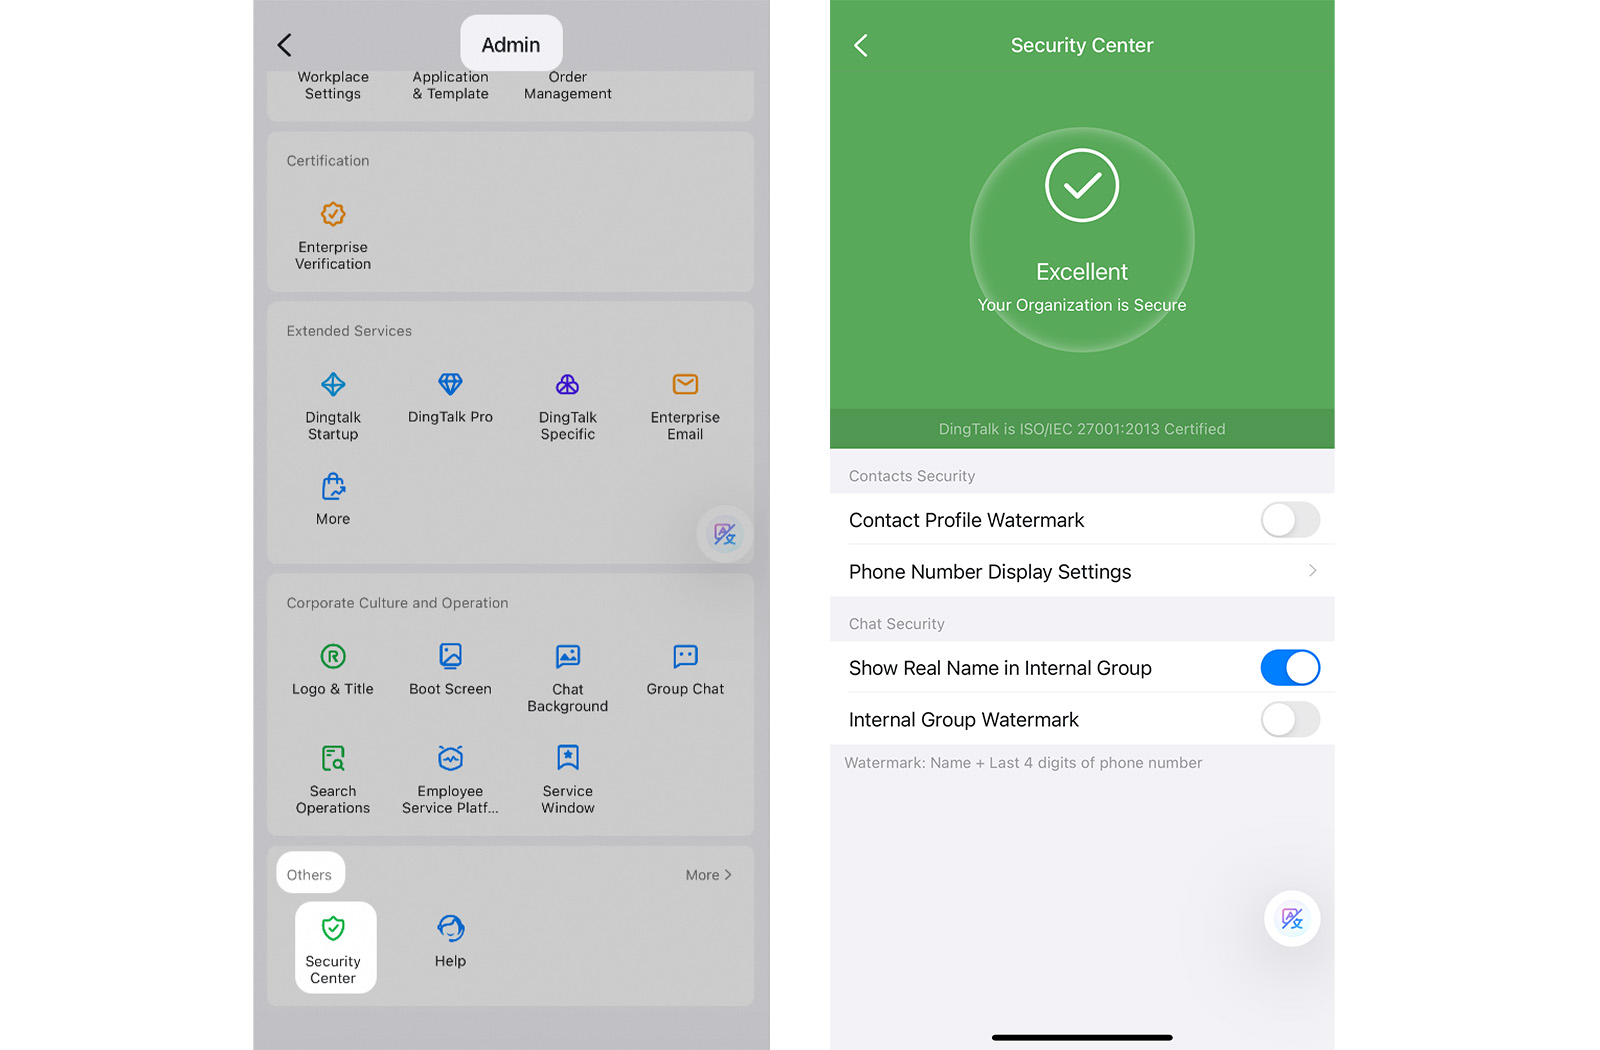
N. Ensure the Security of Enterprise Contacts
Mobile
The administrator can enable watermarks on contact information to prevent screenshots from exposing member details. If the system detects any suspicious activity, it will automatically notify the risk manager.
1. Go to Contacts > Manage.
2. On the admin page, click on Security Center under the “Others” group. Then, turn on the “Contact Profile Watermark”.
O. How to Find Contacts
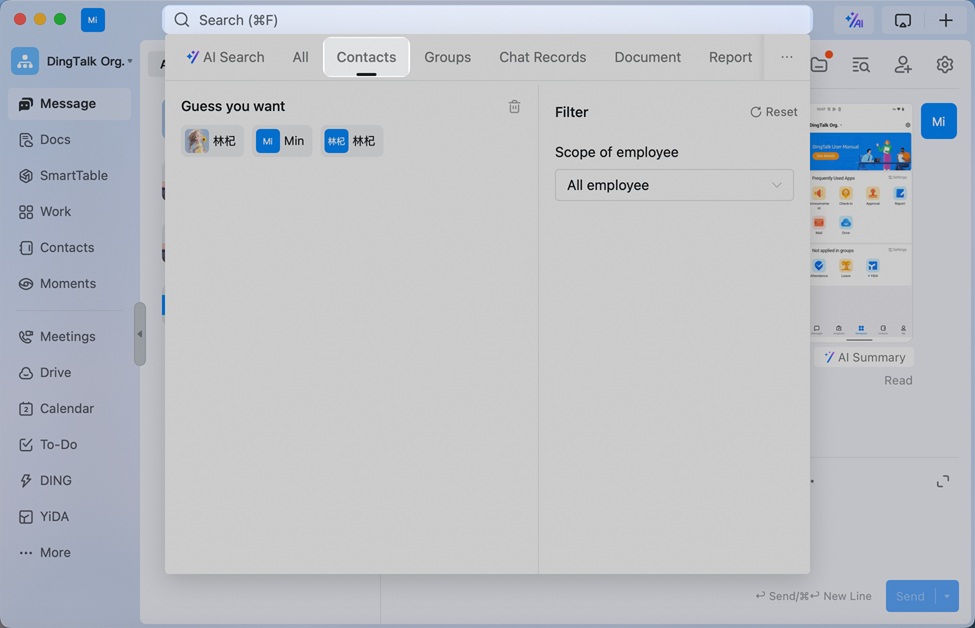
Desktop
1. Click “Search” and chooses “Contacts”.
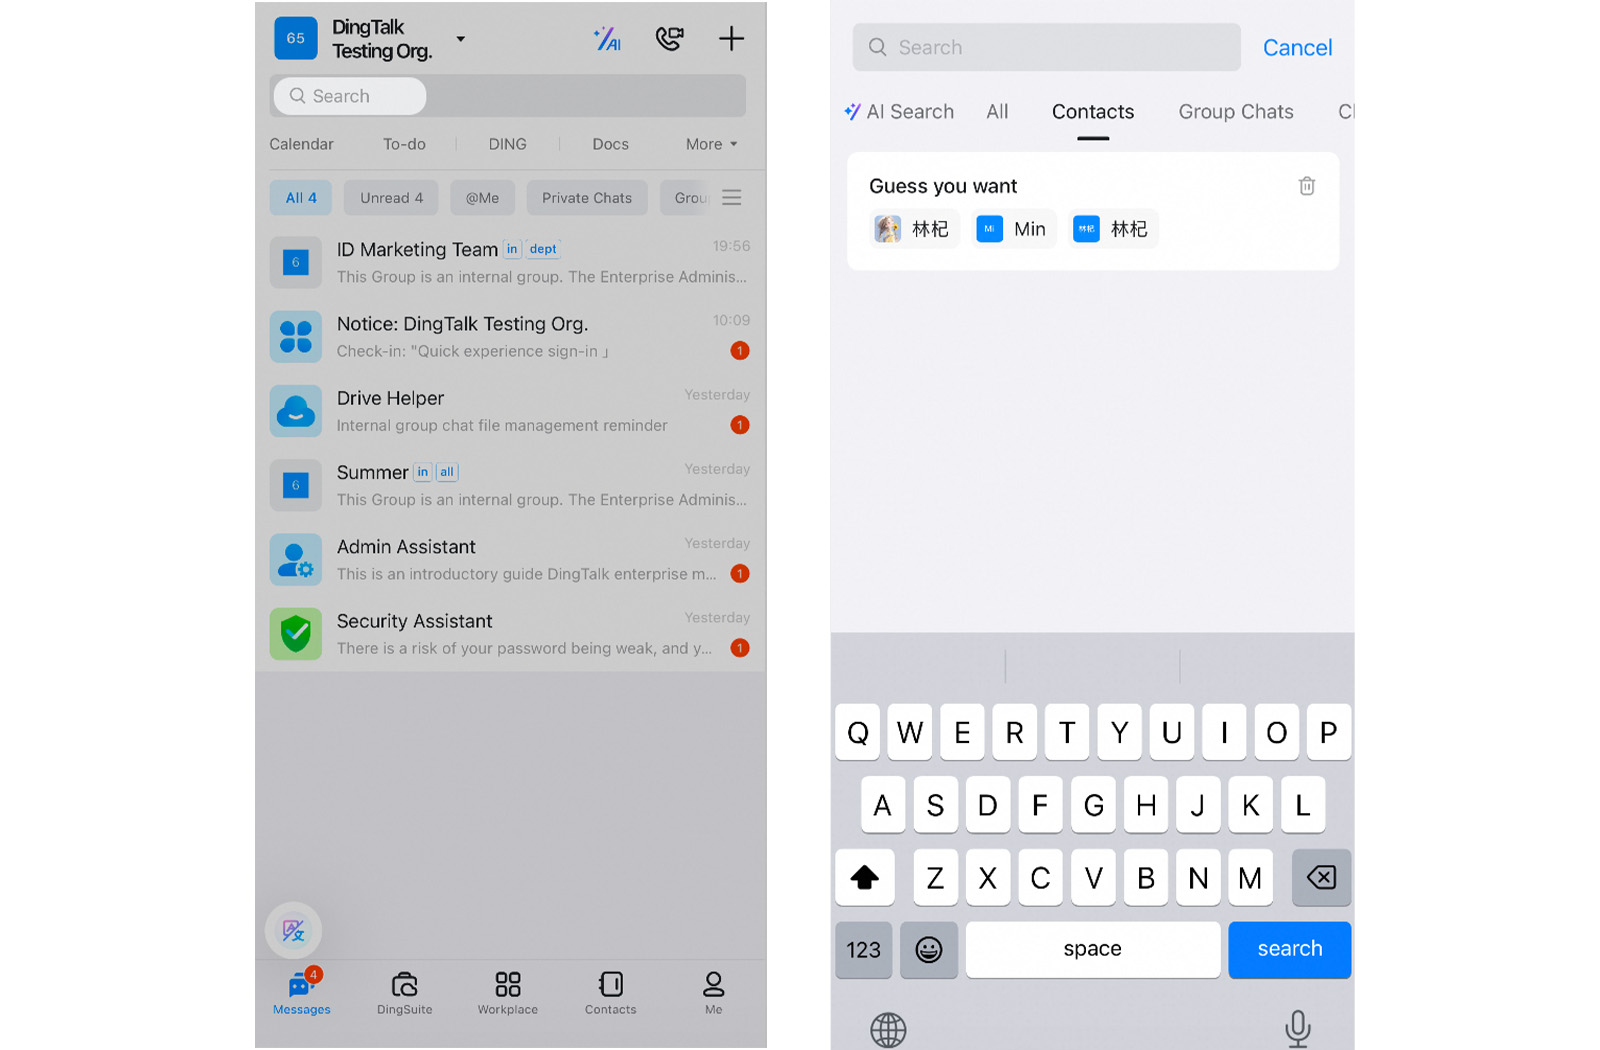
Mobile
1. Go to Messages > Search > Contacts.
P. Remove Members Who Have Resigned
Desktop
Once the administrator deletes a resigned employee from Contacts, the employee will automatically be removed from the organization's All Member Group, department groups, and internal groups to ensure the security of corporate information.
1. Access the Admin Console by clicking on More > Management in DingTalk, or directly visit the website (oa.dingtalk.com). Select your organization and log in to the admin console.
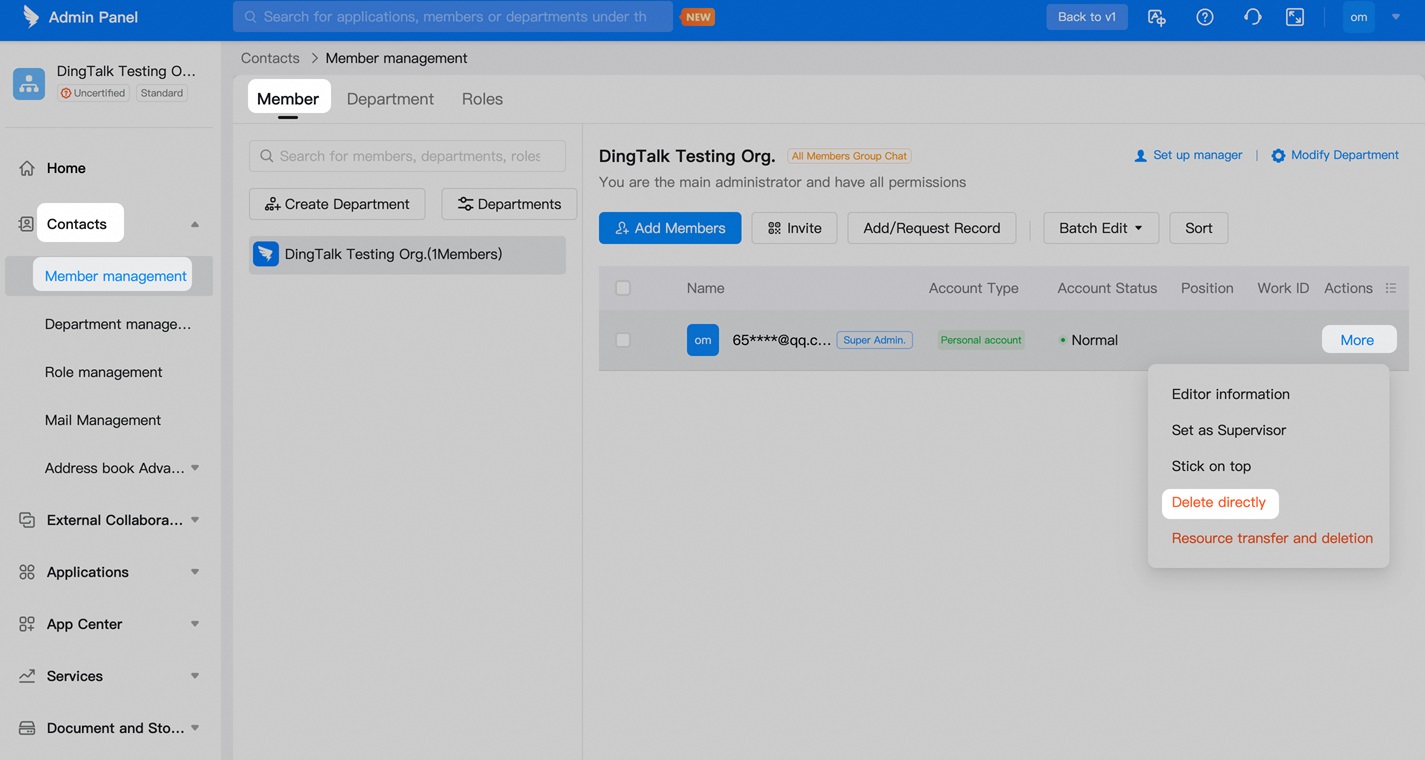
2. To delete members, select the resigned employees and click More > Delete.
Mobile
1. Go to Contacts > Manage > Members and Departments.
2. Locate the members to be deleted, click the edit icon, and remove the employee directly.

Conclusion
Setting up and managing your organization's structure and enterprise contacts in DingTalk is a straightforward process that can greatly enhance communication and collaboration within your team. By following the steps outlined in this guide, you can ensure a seamless experience for all members of your organization. If you need further assistance or are looking for professional services to optimize your DingTalk setup, feel free to contact Appnicorn. Our team is here to help you with all your DingTalk-related needs.